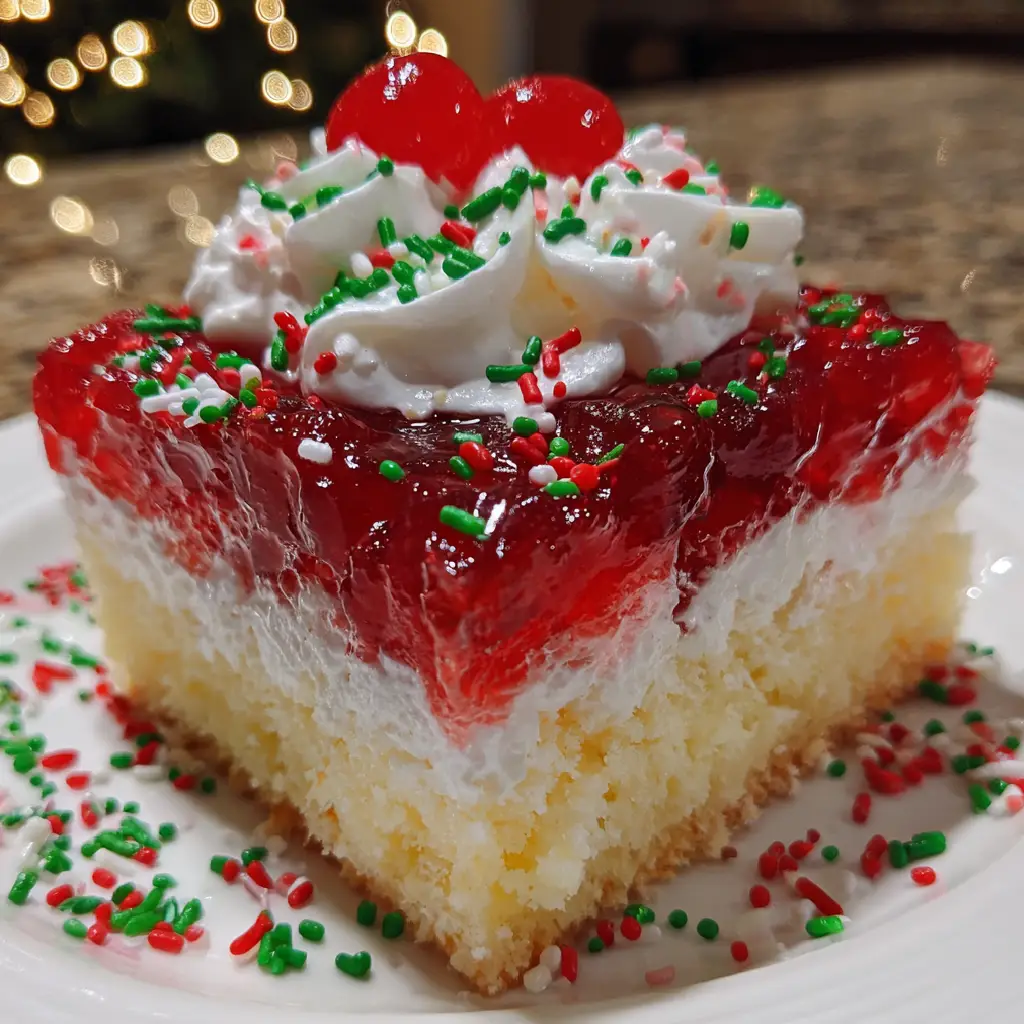
Introduction to Christmas Jello Poke Cake Cups
As the holiday season approaches, I find myself searching for festive treats that are both delightful and easy to whip up. That’s where my Christmas Jello Poke Cake Cups come in! These vibrant, colorful desserts are not only a feast for the eyes but also a quick solution for busy days filled with holiday preparations. Imagine the joy on your loved ones’ faces as they dig into these creamy, jiggly cups of goodness. Perfect for gatherings or cozy family nights, this recipe is sure to become a cherished holiday tradition in your home!
Why You’ll Love This Christmas Jello Poke Cake Cups
These Christmas Jello Poke Cake Cups are a delightful blend of ease and flavor. They come together quickly, making them perfect for busy moms like me who juggle holiday chaos. The moist cake paired with vibrant jello creates a taste sensation that’s both fun and festive. Plus, they’re a hit with kids and adults alike, ensuring smiles all around during your holiday celebrations!
Ingredients for Christmas Jello Poke Cake Cups
Gathering the right ingredients is the first step to creating these festive treats. Here’s what you’ll need:
- White cake mix: This is the base of our dessert, providing a light and fluffy texture.
- Large eggs: Eggs help bind the cake together and add moisture, making it rich and delicious.
- Water: Essential for mixing with the cake mix, it helps achieve the perfect batter consistency.
- Red jello: This adds a pop of color and a burst of fruity flavor, making the cake festive.
- Green jello: Just like the red, this jello brings a vibrant hue and a sweet taste to the mix.
- Boiling water: Used to dissolve the jello, it ensures a smooth and even mixture.
- Cold water: This helps cool down the jello mixture, making it ready to pour over the cake.
- Whipped topping: A creamy finish that adds a delightful texture and sweetness to each cup.
- Sprinkles: These are optional but highly recommended for that extra festive flair!
For exact quantities, check the bottom of the article where you can find everything listed for easy printing. Feel free to get creative with your jello flavors or toppings—after all, the holidays are all about fun and personalization!
How to Make Christmas Jello Poke Cake Cups
Now that we have our ingredients ready, let’s dive into the fun part—making these delightful Christmas Jello Poke Cake Cups! Follow these simple steps, and you’ll have a festive dessert that’s sure to impress.
Step 1: Preheat the Oven
First things first, preheat your oven according to the cake mix instructions. Preheating is crucial because it ensures that your cake bakes evenly. A hot oven helps the cake rise properly, giving it that fluffy texture we all love. So, don’t skip this step!
Step 2: Prepare the Cake Mix
In a large mixing bowl, combine the white cake mix, eggs, and water. Mix until everything is well combined and smooth. I like to use an electric mixer for this, but a whisk works just fine too. The goal is to achieve a batter that’s free of lumps. This will give your cake a light and airy texture.
Step 3: Bake the Cake
Pour the batter into a greased 9×13 inch pan and bake according to the package instructions, usually around 30 minutes. To check for doneness, insert a toothpick into the center of the cake. If it comes out clean, your cake is ready! If not, give it a few more minutes.
Step 4: Cool the Cake
Once baked, let the cake cool in the pan for about 10 minutes. Cooling is essential because it prevents the jello from melting into the cake. If you skip this step, you might end up with a soggy mess instead of a delightful poke cake!
Step 5: Poke Holes in the Cake
Using a fork, poke holes all over the top of the cake. Make sure to space them evenly. This step is key because it allows the jello to seep into the cake, creating those beautiful layers of flavor. Think of it as giving your cake a little spa treatment!
Step 6: Prepare the Jello
In a separate bowl, dissolve the red jello in 1 cup of boiling water. Stir until fully dissolved, then add 1 cup of cold water. The boiling water helps the jello dissolve completely, while the cold water cools it down, making it ready to pour over the cake.
Step 7: Pour the Jello Over the Cake
Carefully pour half of the red jello mixture over the cake, ensuring it seeps into the holes. Repeat the process with the green jello. Pouring slowly helps distribute the jello evenly, creating that stunning layered effect. It’s like painting a masterpiece, but edible!
Step 8: Refrigerate the Cake
Now, it’s time to let the magic happen! Cover the cake and refrigerate for at least 4 hours, or until the jello is set. This chilling time allows the flavors to meld together beautifully. Trust me, the wait is worth it!
Step 9: Add Toppings
Before serving, top your cake with whipped topping and a sprinkle of festive decorations. This final touch adds a creamy layer and a pop of color. It’s the cherry on top of your holiday dessert, making it look as good as it tastes!
Tips for Success
- Always preheat your oven for even baking.
- Let the cake cool completely before adding jello to avoid a soggy texture.
- Use a fork to poke holes evenly for better jello absorption.
- Feel free to mix and match jello flavors for a unique twist.
- Make these cups a day ahead for a stress-free holiday dessert!
Equipment Needed
- Mixing bowl: A large bowl for combining ingredients; a stand mixer works great too.
- 9×13 inch baking pan: Essential for baking the cake; a glass or metal pan will do.
- Fork: For poking holes in the cake; a skewer can be used as an alternative.
- Measuring cups: To ensure accurate ingredient amounts; a kitchen scale is handy too.
- Whisk or electric mixer: For mixing the batter; a hand whisk is perfectly fine!
Variations
- Flavorful Jello Options: Experiment with different jello flavors like orange or blue raspberry for a fun twist!
- Gluten-Free Version: Use a gluten-free cake mix to make this dessert suitable for those with gluten sensitivities.
- Fruit Additions: Add fresh fruit like strawberries or kiwi on top of the whipped topping for a refreshing touch.
- Layered Cups: Instead of a cake, make individual layered cups with cake, jello, and whipped topping for a fun presentation.
- Vegan Adaptation: Substitute eggs with flaxseed meal and use a plant-based whipped topping for a vegan-friendly treat.
Serving Suggestions
- Pair these Christmas Jello Poke Cake Cups with a warm cup of hot cocoa for a cozy treat.
- Serve alongside festive cookies or gingerbread for a delightful dessert spread.
- For a beautiful presentation, use clear cups to showcase the vibrant layers of jello.
- Add a sprig of mint on top for a fresh touch.
FAQs about Christmas Jello Poke Cake Cups
Can I make Christmas Jello Poke Cake Cups in advance?
Absolutely! In fact, making them a day ahead is a great idea. This allows the jello to set properly and the flavors to meld together beautifully. Just keep them covered in the fridge until you’re ready to serve.
What can I use instead of jello?
If you’re looking for alternatives, you can use flavored gelatin or even pudding for a different twist. Just keep in mind that the texture and flavor will change slightly, but it can still be delicious!
How do I store leftovers?
Store any leftover Christmas Jello Poke Cake Cups in an airtight container in the refrigerator. They should stay fresh for about 3-4 days, but I doubt they’ll last that long with how tasty they are!
Can I use different cake flavors?
Definitely! While white cake is traditional, feel free to experiment with other flavors like chocolate or lemon. Just remember that the jello colors will still shine through, so choose flavors that complement your jello choices.
Are these cake cups suitable for kids?
Yes! These Christmas Jello Poke Cake Cups are a hit with kids. The colorful layers and fun textures make them an exciting treat for little ones during the holiday season!
Final Thoughts
Creating Christmas Jello Poke Cake Cups is more than just baking; it’s about making memories with loved ones. The vibrant colors and delightful flavors bring a sense of joy to any holiday gathering. I love how this recipe allows for creativity, whether through different jello flavors or festive toppings. Plus, it’s a fantastic way to involve the kids in the kitchen, turning dessert-making into a fun family activity. As you serve these delightful cups, you’ll see smiles all around, making the effort truly worthwhile. Embrace the holiday spirit and enjoy every delicious bite!
Print
Christmas Jello Poke Cake Cups: Delightful Holiday Treats!
- Prep Time: 20 minutes
- Cook Time: 30 minutes
- Total Time: 4 hours 50 minutes
- Yield: 12 servings 1x
- Category: Dessert
- Method: Baking
- Cuisine: American
- Diet: Vegetarian
Description
Christmas Jello Poke Cake Cups are a festive and delightful dessert that combines moist cake with vibrant jello and creamy toppings, perfect for holiday celebrations.
Ingredients
- 1 box of white cake mix
- 3 large eggs
- 1 cup of water
- 1 box of red jello
- 1 box of green jello
- 1 cup of boiling water
- 1 cup of cold water
- 1 cup of whipped topping
- Sprinkles for decoration
Instructions
- Preheat the oven according to the cake mix instructions.
- Prepare the cake mix as directed, adding eggs and water.
- Bake the cake in a 9×13 inch pan until golden brown.
- Once baked, let the cake cool for a few minutes.
- Use a fork to poke holes all over the top of the cake.
- In a separate bowl, dissolve the red jello in 1 cup of boiling water, then add 1 cup of cold water.
- Pour half of the red jello mixture over the cake, ensuring it seeps into the holes.
- Repeat the process with the green jello, pouring it over the cake.
- Refrigerate the cake for at least 4 hours or until set.
- Before serving, top with whipped topping and sprinkles.
Notes
- For a more festive look, use holiday-themed sprinkles.
- Make sure to let the cake cool completely before adding jello.
- This dessert can be made a day in advance for convenience.
Nutrition
- Serving Size: 1 cup
- Calories: 250
- Sugar: 20g
- Sodium: 200mg
- Fat: 8g
- Saturated Fat: 3g
- Unsaturated Fat: 5g
- Trans Fat: 0g
- Carbohydrates: 40g
- Fiber: 1g
- Protein: 3g
- Cholesterol: 30mg


")