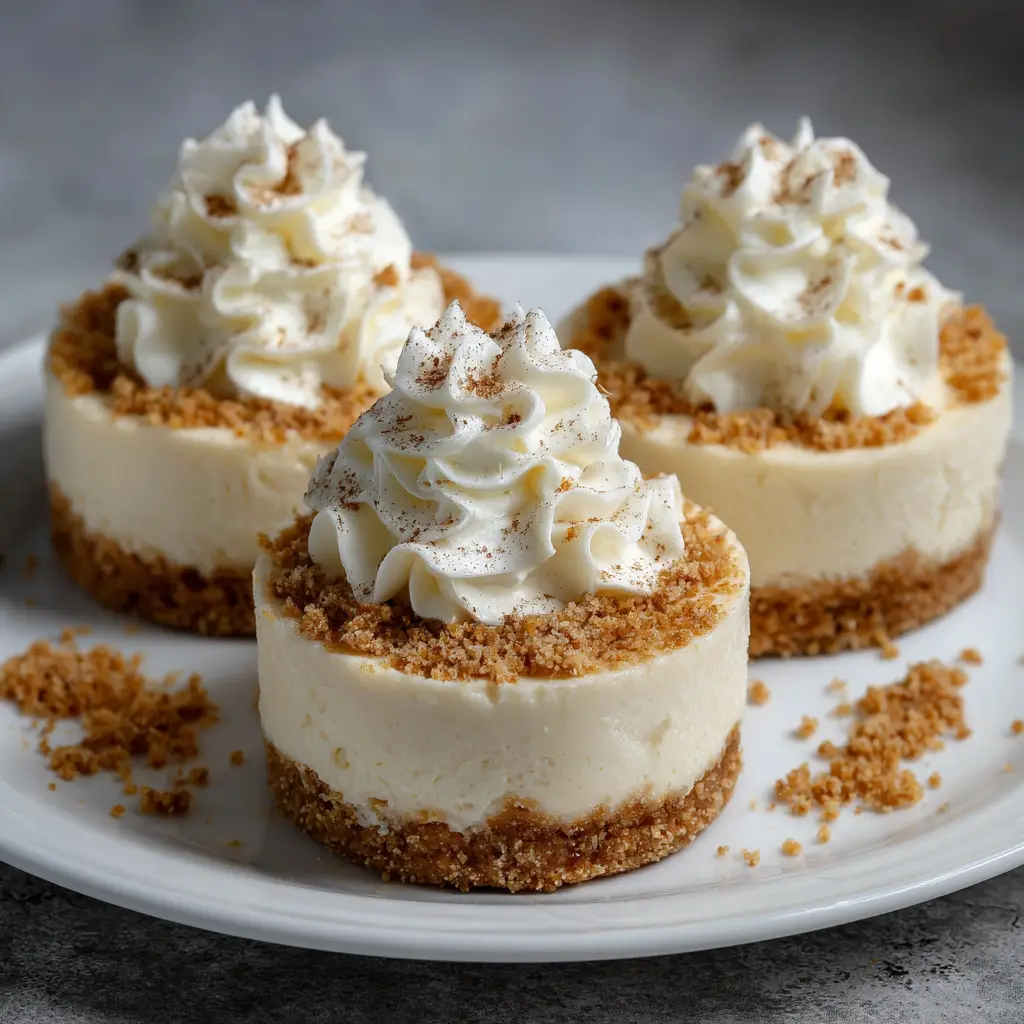
Introduction to Mini Eggnog Mousse Cheesecakes
As the holiday season approaches, I find myself dreaming of cozy gatherings and sweet treats. That’s where these delightful Mini Eggnog Mousse Cheesecakes come in! They’re the perfect blend of creamy cheesecake and festive eggnog flavor, making them a hit at any holiday party. If you’re a busy mom or professional like me, you’ll appreciate how quick and easy these are to whip up. Plus, they’re sure to impress your loved ones, leaving them asking for seconds. Let’s dive into this delicious recipe that brings joy in every bite!
Why You’ll Love This Mini Eggnog Mousse Cheesecakes
These Mini Eggnog Mousse Cheesecakes are a dream come true for busy cooks! They come together in just a few simple steps, making them a quick solution for holiday gatherings. The creamy texture and rich eggnog flavor will transport you to a winter wonderland with every bite. Plus, they’re perfectly portioned, so you can indulge without the guilt. Trust me, these little delights will become a holiday staple in your home!
Ingredients for Mini Eggnog Mousse Cheesecakes
Gathering the right ingredients is the first step to creating these delightful Mini Eggnog Mousse Cheesecakes. Here’s what you’ll need:
- Graham cracker crumbs: These form the base of your cheesecake, providing a sweet and crunchy texture.
- Unsalted butter: Melted butter binds the crumbs together, ensuring a firm crust that holds its shape.
- Cream cheese: The star of the show! Softened cream cheese gives the cheesecake its rich and creamy consistency.
- Powdered sugar: This sweetener blends smoothly into the cream cheese, adding just the right amount of sweetness.
- Eggnog: The festive flavor that makes these cheesecakes special! Use your favorite store-bought or homemade eggnog.
- Vanilla extract: A splash of vanilla enhances the overall flavor, making it even more delicious.
- Ground nutmeg: This warm spice adds a cozy holiday aroma and taste, perfectly complementing the eggnog.
- Heavy cream: Whipped to perfection, it lightens the cheesecake filling and adds a fluffy texture.
- Sugar: A little sugar in the whipped cream helps stabilize it and adds sweetness.
- Whipped cream for topping: A dollop of whipped cream on top makes for a beautiful presentation and extra creaminess.
- Ground nutmeg for garnish: A sprinkle on top not only looks pretty but also enhances the eggnog flavor.
For exact measurements, check the bottom of the article where you can find everything listed for easy printing. Feel free to get creative with your ingredients! You can swap out the graham cracker crumbs for crushed cookies or use a dairy-free cream cheese for a lighter version. The possibilities are endless!
How to Make Mini Eggnog Mousse Cheesecakes
Now that you have your ingredients ready, let’s dive into the fun part—making these Mini Eggnog Mousse Cheesecakes! Follow these simple steps, and you’ll have a festive dessert that will wow your family and friends.
Step 1: Preheat the Oven
First things first, preheat your oven to 325°F (160°C). Preheating is crucial because it ensures that your cheesecakes bake evenly. A hot oven helps set the filling just right, giving you that perfect creamy texture. Trust me, you don’t want to skip this step!
Step 2: Prepare the Crust
In a mixing bowl, combine your graham cracker crumbs with the melted butter. Stir until the crumbs are fully coated. This mixture should resemble wet sand. Now, press it firmly into the bottom of your mini cheesecake pans. A solid crust is key; it holds everything together and adds that delightful crunch!
Step 3: Make the Cheesecake Filling
In a large bowl, beat the softened cream cheese and powdered sugar until smooth and creamy. This step is where the magic begins! Next, add in the eggnog, vanilla extract, and ground nutmeg. Mix until everything is well combined. The aroma will be heavenly, and you’ll be tempted to taste it—go ahead, I won’t tell!
Step 4: Whip the Cream
In a separate bowl, whip the heavy cream and sugar together until stiff peaks form. This means when you lift the whisk, the cream holds its shape. This step is crucial for achieving that light and fluffy mousse texture. It’s like adding a cloud to your cheesecake!
Step 5: Combine and Pour
Now, gently fold the whipped cream into the cheesecake mixture. Use a spatula and be careful not to deflate the whipped cream. You want to keep that airy texture! Once combined, pour the mixture over the crusts in your mini pans. It should look luscious and inviting!
Step 6: Bake
Place your mini cheesecakes in the preheated oven and bake for 20-25 minutes. They should be set but still slightly jiggly in the center. To check for doneness, gently shake the pan. If the edges are firm and the center has a slight wobble, they’re ready!
Step 7: Cool and Refrigerate
After baking, let the cheesecakes cool at room temperature for about 30 minutes. Then, refrigerate them for at least 4 hours, or overnight if you can wait! Chilling allows the flavors to meld beautifully and gives you that perfect creamy texture.
Step 8: Serve
When you’re ready to serve, top each cheesecake with a generous dollop of whipped cream and a sprinkle of ground nutmeg. This not only adds a festive touch but also enhances the eggnog flavor. Your Mini Eggnog Mousse Cheesecakes are now ready to be devoured!
Tips for Success
- Make sure your cream cheese is at room temperature for easy mixing.
- Don’t overmix the whipped cream; fold gently to maintain its lightness.
- For a stronger eggnog flavor, feel free to add a splash more eggnog to the filling.
- Chill the cheesecakes overnight for the best flavor and texture.
- Use a hot knife to slice through the cheesecakes for clean edges.
Equipment Needed
- Mini cheesecake pans: These are perfect for portion control. If you don’t have them, use a muffin tin lined with paper liners.
- Mixing bowls: A set of various sizes will help you with different steps.
- Electric mixer: This makes beating the cream cheese and whipping the cream a breeze. A whisk works too, but it’ll take longer!
- Spatula: Essential for folding and scraping down the sides of your bowls.
- Measuring cups and spoons: Accurate measurements are key to success!
Variations
- Chocolate Eggnog Mousse Cheesecakes: Add cocoa powder to the filling for a rich chocolate twist that pairs beautifully with eggnog.
- Spiced Rum Version: Incorporate a splash of spiced rum into the filling for an adult-friendly treat that enhances the holiday spirit.
- Dairy-Free Option: Substitute cream cheese with a dairy-free alternative and use coconut cream instead of heavy cream for a lighter version.
- Gluten-Free Crust: Use gluten-free graham crackers or crushed nuts mixed with melted butter for a gluten-free crust option.
- Mini Eggnog Mousse Parfaits: Layer the cheesecake filling and crust in small glasses for a fun and elegant presentation.
Serving Suggestions
- Pair with a warm cup of spiced chai or hot cocoa for a cozy treat.
- Serve alongside a fresh fruit salad for a refreshing contrast.
- Garnish with festive sprigs of mint or cranberries for a pop of color.
- Present on a decorative platter for an eye-catching holiday display.
- Offer a drizzle of caramel or chocolate sauce for an extra indulgent touch.
FAQs about Mini Eggnog Mousse Cheesecakes
Can I make Mini Eggnog Mousse Cheesecakes ahead of time?
Absolutely! These cheesecakes can be made a day in advance. Just store them in the refrigerator until you’re ready to serve. This actually enhances the flavors!
What can I use instead of eggnog?
If you don’t have eggnog on hand, you can substitute it with a mixture of milk, cream, and a dash of nutmeg and vanilla. It won’t be quite the same, but it will still be delicious!
How do I store leftovers?
Store any leftover Mini Eggnog Mousse Cheesecakes in an airtight container in the refrigerator. They’ll stay fresh for up to three days, but trust me, they won’t last that long!
Can I freeze these cheesecakes?
Yes, you can freeze them! Just make sure to wrap them tightly in plastic wrap and then place them in a freezer-safe container. Thaw in the refrigerator before serving.
What’s the best way to serve these cheesecakes?
Top each cheesecake with whipped cream and a sprinkle of ground nutmeg for a festive touch. You can also add a drizzle of caramel or chocolate sauce for an extra treat!
Final Thoughts
Creating these Mini Eggnog Mousse Cheesecakes is more than just baking; it’s about sharing joy and warmth with those you love. Each bite is a delightful reminder of the holiday spirit, bringing smiles and happy memories to your gatherings. Whether you’re hosting a festive party or enjoying a quiet evening at home, these cheesecakes are sure to elevate the moment. Plus, the ease of preparation means you can focus on what truly matters—spending time with family and friends. So, roll up your sleeves and let the magic of these cheesecakes fill your home with cheer!
Print
Mini Eggnog Mousse Cheesecakes That Delight in Every Bite!
- Prep Time: 20 minutes
- Cook Time: 25 minutes
- Total Time: 4 hours 45 minutes
- Yield: 12 mini cheesecakes 1x
- Category: Dessert
- Method: Baking
- Cuisine: American
- Diet: Vegetarian
Description
Delicious mini cheesecakes infused with eggnog flavor, topped with a light and fluffy mousse.
Ingredients
- 1 cup graham cracker crumbs
- 1/4 cup unsalted butter, melted
- 2 cups cream cheese, softened
- 1 cup powdered sugar
- 1 cup eggnog
- 1 teaspoon vanilla extract
- 1 teaspoon ground nutmeg
- 1 cup heavy cream
- 1/4 cup sugar
- Whipped cream for topping
- Ground nutmeg for garnish
Instructions
- Preheat the oven to 325°F (160°C).
- In a bowl, mix graham cracker crumbs and melted butter until combined.
- Press the mixture into the bottom of mini cheesecake pans.
- In a large bowl, beat cream cheese and powdered sugar until smooth.
- Add eggnog, vanilla extract, and ground nutmeg; mix until well combined.
- In a separate bowl, whip heavy cream and sugar until stiff peaks form.
- Fold the whipped cream into the eggnog mixture gently.
- Pour the mixture over the crusts in the mini pans.
- Bake for 20-25 minutes or until set.
- Let cool, then refrigerate for at least 4 hours before serving.
- Top with whipped cream and a sprinkle of ground nutmeg before serving.
Notes
- For a stronger eggnog flavor, add more eggnog to the filling.
- These can be made a day in advance for convenience.
- Store leftovers in the refrigerator for up to 3 days.
Nutrition
- Serving Size: 1 cheesecake
- Calories: 250
- Sugar: 15g
- Sodium: 150mg
- Fat: 18g
- Saturated Fat: 10g
- Unsaturated Fat: 5g
- Trans Fat: 0g
- Carbohydrates: 20g
- Fiber: 1g
- Protein: 3g
- Cholesterol: 60mg

")