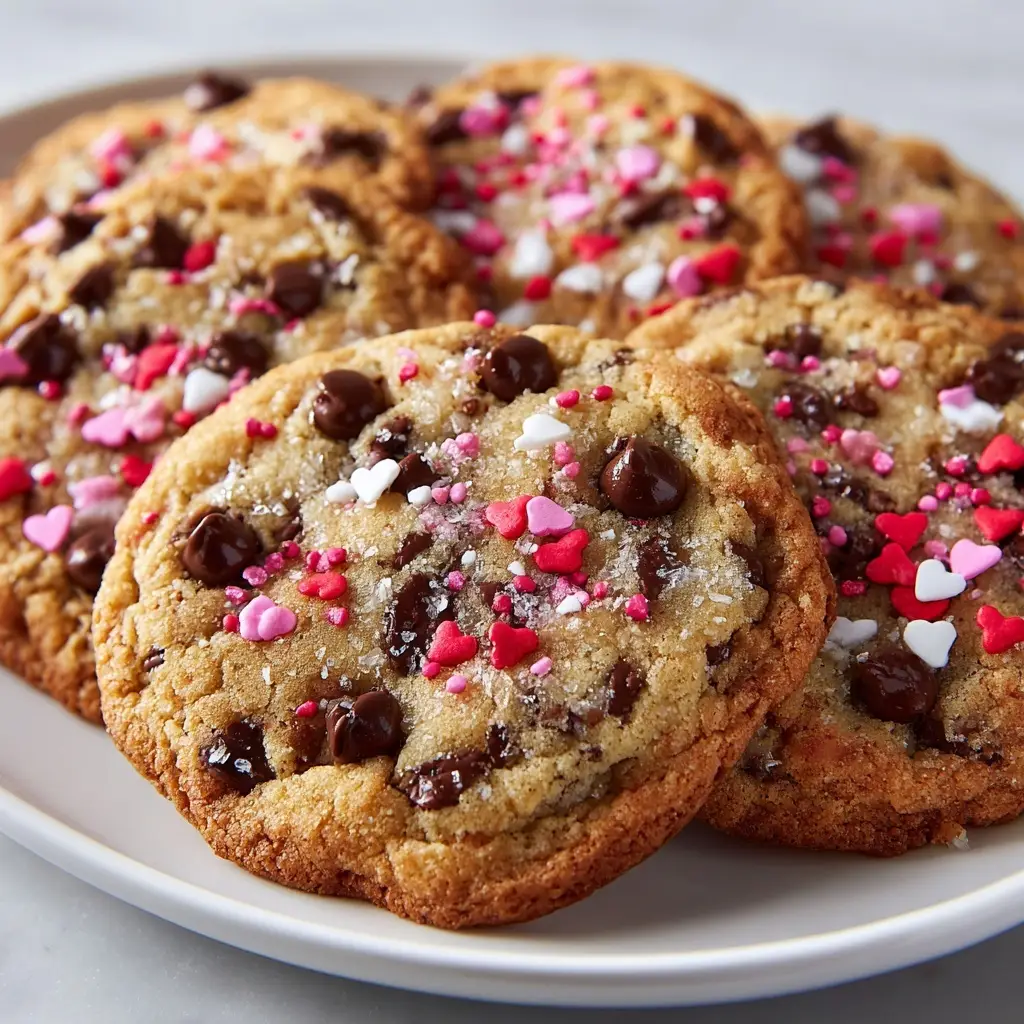
Introduction to Valentines Day Cookies
Valentine’s Day is just around the corner, and what better way to express your love than with homemade Valentine’s Day cookies? These delightful treats are not only delicious but also a heartfelt gesture that can brighten anyone’s day. I know how busy life can get, especially for us moms and professionals, so this recipe is a quick solution for whipping up something special. Whether you’re surprising your partner, sharing with friends, or treating the kids, these cookies are sure to impress and spread joy. Let’s dive into this sweet adventure together!
Why You’ll Love This Valentines Day Cookies
These Valentine’s Day cookies are a dream come true for busy cooks like us! They come together in just 32 minutes, making them perfect for last-minute baking. The combination of buttery goodness, chocolate chips, and festive sprinkles creates a taste that’s simply irresistible. Plus, they’re versatile enough to customize for any palate. You’ll love how easy they are to make, and your loved ones will adore the sweet surprise!
Ingredients for Valentines Day Cookies
Gathering the right ingredients is the first step to creating these delightful Valentine’s Day cookies. Here’s what you’ll need:
- All-purpose flour: This is the backbone of your cookies, providing structure and texture.
- Baking soda: A leavening agent that helps the cookies rise and become fluffy.
- Salt: Just a pinch enhances the sweetness and balances flavors.
- Unsalted butter: Softened butter adds richness and moisture, making your cookies tender.
- Granulated sugar: This sweetener gives the cookies their delightful sweetness and helps with browning.
- Brown sugar: Packed brown sugar adds a hint of caramel flavor and moisture.
- Eggs: They bind the ingredients together and contribute to the cookies’ structure.
- Vanilla extract: A splash of vanilla brings warmth and depth to the flavor profile.
- Chocolate chips: These are the stars of the show, providing melty, gooey goodness in every bite.
- Heart-shaped sprinkles: Optional, but they add a festive touch that’s perfect for Valentine’s Day!
Feel free to customize your cookies with different types of chocolate or sprinkles. You can find all the exact measurements at the bottom of the article, ready for printing. Happy baking!
How to Make Valentines Day Cookies
Now that we have our ingredients ready, let’s get baking! Making these Valentine’s Day cookies is a fun and straightforward process. Follow these steps, and you’ll have a batch of sweet treats in no time!
Step 1: Preheat the Oven
First things first, preheat your oven to 350°F (175°C). Preheating is crucial because it ensures that your cookies bake evenly. If the oven isn’t hot enough, your cookies might spread too much or not rise properly. Trust me, a well-preheated oven is the secret to cookie perfection!
Step 2: Prepare the Dry Ingredients
In a mixing bowl, whisk together the all-purpose flour, baking soda, and salt. This step is essential for creating the perfect cookie base. Whisking helps to evenly distribute the baking soda and salt throughout the flour, ensuring that every bite is balanced. Plus, it adds a little air, which is great for texture!
Step 3: Cream the Butter and Sugars
In another bowl, cream together the softened unsalted butter, granulated sugar, and brown sugar until the mixture is smooth and fluffy. This process is vital for achieving the right texture. Creaming incorporates air into the butter, which helps your cookies rise beautifully. You want a light and airy mixture, so don’t rush this step!
Step 4: Add Eggs and Vanilla
Next, add the eggs and vanilla extract to the butter mixture. Mix well until everything is combined. The eggs act as a binder, holding the ingredients together, while the vanilla adds a warm, inviting flavor. It’s like a hug for your taste buds!
Step 5: Combine Wet and Dry Ingredients
Now, gradually add the dry ingredients to the wet mixture. Mix until just combined. Be careful not to overwork the dough, as this can lead to tough cookies. You want to see a few flour streaks; it’s okay if it’s not perfectly smooth. This is where the magic happens!
Step 6: Fold in Chocolate Chips and Sprinkles
Gently fold in the chocolate chips and heart-shaped sprinkles. This is where you can get creative! Feel free to swap in different types of chocolate or even nuts if you like. The mix-ins add delightful surprises in every bite, making your cookies even more special.
Step 7: Shape the Cookies
Using a tablespoon, drop rounded portions of dough onto ungreased baking sheets. Make sure to leave some space between each cookie, as they will spread while baking. For uniform cookies, you can use a cookie scoop. It’s a game-changer for even baking!
Step 8: Bake the Cookies
Bake your cookies in the preheated oven for 10-12 minutes. Keep an eye on them! You want the edges to be golden brown while the centers remain soft. A little trick: they will continue to cook on the baking sheet after you take them out, so don’t overbake!
Step 9: Cool and Enjoy
Once baked, allow the cookies to cool on the baking sheet for a few minutes before transferring them to a wire rack. This cooling time is essential for achieving the perfect texture. Warm cookies are delightful, but letting them cool completely allows the flavors to develop even more. Now, grab a glass of milk and enjoy your delicious Valentine’s Day cookies!
Tips for Success
- Use room temperature ingredients for better mixing.
- Don’t skip the chilling step if you have time; it helps prevent spreading.
- Experiment with different chocolate types for unique flavors.
- Keep an eye on baking time; every oven is different!
- Store cookies in an airtight container to maintain freshness.
Equipment Needed
- Baking sheets: If you don’t have non-stick sheets, parchment paper works wonders.
- Mixing bowls: A set of different sizes is handy, but any large bowl will do.
- Whisk: A fork can substitute in a pinch for whisking dry ingredients.
- Cookie scoop: A tablespoon works just as well for portioning dough.
- Wire rack: If you don’t have one, a plate can serve for cooling cookies.
Variations for Valentines Day Cookies
- Gluten-Free: Substitute all-purpose flour with a gluten-free blend for a delicious gluten-free option.
- Vegan: Replace butter with coconut oil and use flax eggs instead of regular eggs for a plant-based treat.
- Nutty Delight: Add chopped nuts like walnuts or pecans for a crunchy texture and extra flavor.
- Mint Chocolate: Incorporate mint chocolate chips instead of regular chocolate for a refreshing twist.
- Fruit-Infused: Mix in dried cranberries or cherries for a fruity burst in every bite.
Serving Suggestions for Valentines Day Cookies
- Pair your cookies with a glass of cold milk or a warm cup of hot chocolate for a cozy treat.
- Serve them on a decorative platter, sprinkled with extra heart-shaped sprinkles for a festive touch.
- Wrap cookies in cellophane bags tied with ribbon for a sweet gift.
- Enjoy them alongside fresh strawberries or raspberries for a fruity contrast.
FAQs about Valentines Day Cookies
Can I make these Valentines Day cookies ahead of time?
Absolutely! You can prepare the dough in advance and refrigerate it for up to three days. Just scoop the dough onto baking sheets when you’re ready to bake. This way, you can enjoy fresh cookies anytime!
What can I use instead of chocolate chips?
If chocolate isn’t your thing, try using white chocolate chips, butterscotch chips, or even dried fruits like cranberries. The possibilities are endless, and each variation brings a unique flavor to your Valentine’s Day cookies!
How should I store my cookies?
To keep your cookies fresh, store them in an airtight container at room temperature. They’ll stay delicious for up to a week. If you want to keep them longer, consider freezing them!
Can I freeze the cookie dough?
Yes! You can freeze the cookie dough for up to three months. Just scoop the dough into balls, freeze them on a baking sheet, and then transfer to a freezer bag. When you’re ready to bake, just add a couple of extra minutes to the baking time.
What if my cookies turn out too flat?
If your cookies spread too much, it could be due to warm butter or not enough flour. Make sure your butter is softened but not melted, and consider chilling the dough for 30 minutes before baking. This helps them hold their shape!
Final Thoughts
Making these Valentine’s Day cookies is more than just baking; it’s about creating sweet memories with loved ones. The joy of pulling warm, gooey cookies from the oven fills the kitchen with love and laughter. Each bite is a reminder of the special moments we share, whether it’s a cozy night in or a festive gathering. Plus, the smiles on my family’s faces when they taste these treats are priceless. So, gather your ingredients, embrace the process, and let the sweetness of these cookies bring you closer to those you cherish. Happy baking!
Print
Valentines Day Cookies: Delight Loved Ones with Sweetness!
- Prep Time: 20 minutes
- Cook Time: 12 minutes
- Total Time: 32 minutes
- Yield: 24 cookies 1x
- Category: Dessert
- Method: Baking
- Cuisine: American
- Diet: Vegetarian
Description
Delicious and festive cookies perfect for celebrating Valentine’s Day with loved ones.
Ingredients
- 2 3/4 cups all-purpose flour
- 1 teaspoon baking soda
- 1/2 teaspoon salt
- 1 cup unsalted butter, softened
- 1 1/2 cups granulated sugar
- 1 cup brown sugar, packed
- 2 large eggs
- 2 teaspoons vanilla extract
- 1 cup chocolate chips
- 1/2 cup sprinkles (heart-shaped preferred)
Instructions
- Preheat the oven to 350°F (175°C).
- In a bowl, whisk together flour, baking soda, and salt.
- In a separate bowl, cream together the butter, granulated sugar, and brown sugar until smooth.
- Add the eggs and vanilla extract to the butter mixture and mix well.
- Gradually add the dry ingredients to the wet ingredients, mixing until just combined.
- Fold in the chocolate chips and sprinkles.
- Drop rounded tablespoons of dough onto ungreased baking sheets.
- Bake for 10-12 minutes or until the edges are golden.
- Allow cookies to cool on the baking sheet for a few minutes before transferring to a wire rack to cool completely.
Notes
- For a softer cookie, do not overbake.
- Feel free to customize with different types of chocolate or sprinkles.
- Store cookies in an airtight container for up to a week.
Nutrition
- Serving Size: 1 cookie
- Calories: 150
- Sugar: 10g
- Sodium: 100mg
- Fat: 7g
- Saturated Fat: 4g
- Unsaturated Fat: 2g
- Trans Fat: 0g
- Carbohydrates: 20g
- Fiber: 1g
- Protein: 2g
- Cholesterol: 20mg


")