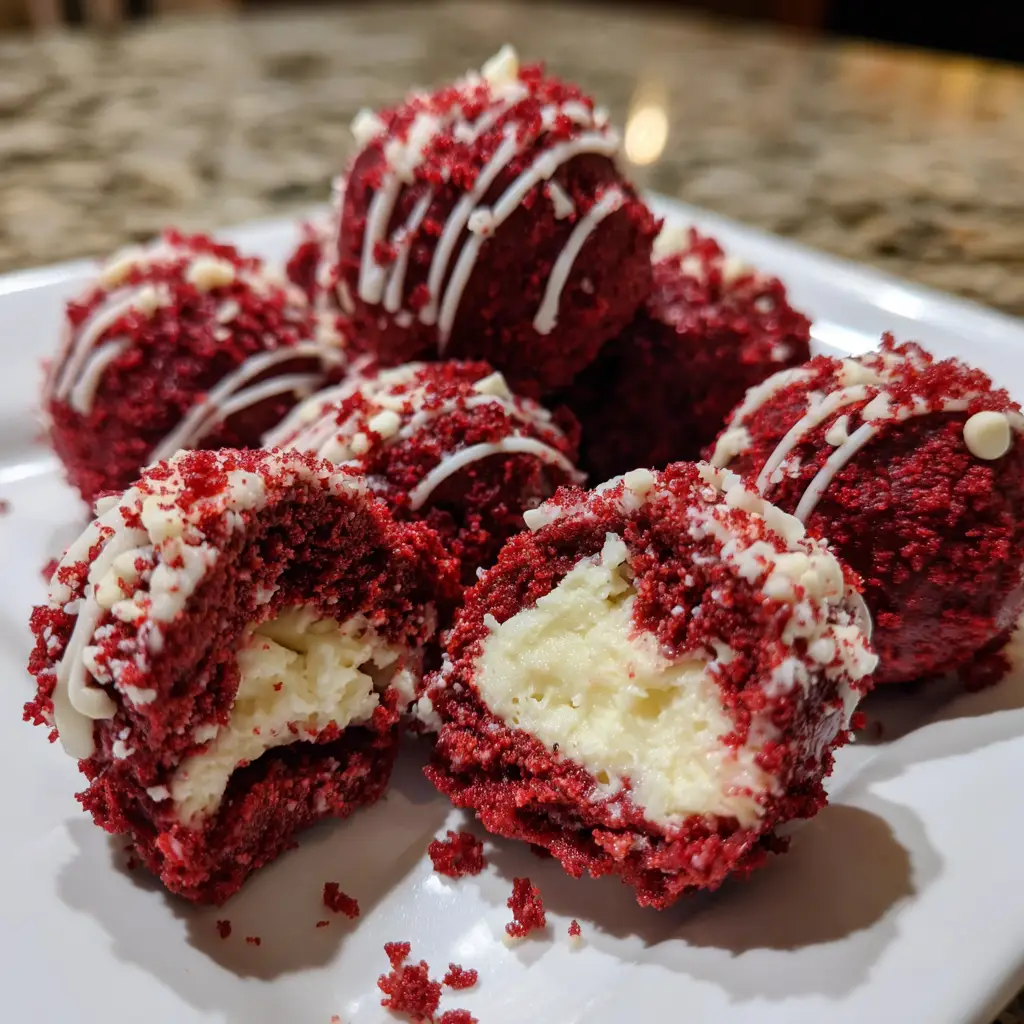
Introduction to Mini Red Velvet Cheesecake Truffles
As a busy mom, I know how precious time can be, especially when it comes to whipping up something sweet. That’s why I absolutely adore these Mini Red Velvet Cheesecake Truffles! They’re not just a treat; they’re a delightful escape from the everyday hustle. Imagine sinking your teeth into a rich, creamy bite that combines the classic flavors of red velvet cake and cheesecake. Perfect for any occasion, these truffles are a quick solution for a busy day or a charming dessert to impress your loved ones. Trust me, they’ll be asking for seconds!
Why You’ll Love This Mini Red Velvet Cheesecake Truffles
These Mini Red Velvet Cheesecake Truffles are a dream come true for anyone short on time but big on flavor. They come together in just 50 minutes, making them a perfect last-minute dessert. Plus, the combination of rich red velvet and creamy cheesecake is simply irresistible! Whether you’re hosting a gathering or just treating yourself, these truffles are sure to bring smiles and sweet satisfaction to your day.
Ingredients for Mini Red Velvet Cheesecake Truffles
Gathering the right ingredients is the first step to creating these delightful Mini Red Velvet Cheesecake Truffles. Here’s what you’ll need:
- Red velvet cake crumbs: The star of the show! You can use leftover cake or make a fresh batch. The vibrant color and flavor are essential.
- Cream cheese: This adds that luscious, creamy texture. Make sure it’s softened to room temperature for easy mixing.
- Powdered sugar: Sweetness is key! This fine sugar blends smoothly into the mixture, giving the truffles their delightful sweetness.
- Vanilla extract: A splash of vanilla enhances the flavors, making each bite even more delicious.
- White chocolate chips: These are for dipping, creating a sweet outer layer. You can also use dark or milk chocolate if you prefer.
- Vegetable oil: This helps the chocolate melt smoothly, ensuring a perfect coating for your truffles.
- Red sprinkles: These are optional but add a festive touch! They make your truffles look as good as they taste.
For exact measurements, check the bottom of the article where you can find everything listed for easy printing. Happy cooking!
How to Make Mini Red Velvet Cheesecake Truffles
Step 1: Prepare the Mixture
Let’s kick things off by mixing our ingredients! In a large bowl, combine the red velvet cake crumbs, softened cream cheese, powdered sugar, and vanilla extract. I like to use a spatula or a sturdy spoon to blend everything together. You want a smooth, cohesive mixture that holds together well. It should be creamy and slightly sticky, just like a dream! If you find it too crumbly, don’t hesitate to add a touch more cream cheese. This step is crucial for that rich cheesecake flavor in your Mini Red Velvet Cheesecake Truffles.
Step 2: Form the Truffles
Now comes the fun part—rolling the mixture into truffles! Take a small scoop of the mixture, about the size of a tablespoon, and roll it between your palms to form a ball. It’s like crafting little edible gems! Place each ball on a baking sheet lined with parchment paper. Make sure to leave some space between them, as they might expand slightly when chilled. If you have little helpers, this is a great step for them to join in. They’ll love getting their hands messy while creating these delightful treats!
Step 3: Chill the Truffles
Chilling is essential for the perfect texture. Pop the baking sheet with your truffles into the refrigerator for about 30 minutes. This helps them firm up, making them easier to dip later. Plus, it enhances the flavors as they meld together. Trust me, the wait will be worth it when you take that first bite!
Step 4: Melt the Chocolate
While the truffles chill, let’s melt the white chocolate chips! In a microwave-safe bowl, combine the chocolate chips with a tablespoon of vegetable oil. The oil helps the chocolate melt smoothly and gives it a nice sheen. Microwave in 30-second intervals, stirring in between, until the chocolate is completely melted and smooth. Be careful not to overheat it, as burnt chocolate can ruin your dipping experience. Once melted, set it aside to cool slightly while you prepare for the next step.
Step 5: Dip the Truffles
It’s time to dip! Take each chilled truffle and carefully dip it into the melted chocolate. Use a fork to lift it out, allowing any excess chocolate to drip off. This creates a beautiful coating that’s both sweet and creamy. If you want a thicker layer, feel free to dip them twice! Just remember to let the first layer set a bit before the second dip. Place the dipped truffles back on the parchment paper, ready for their final touch.
Step 6: Decorate and Set
Now for the finishing touch—decoration! While the chocolate is still wet, sprinkle the truffles with red sprinkles. This adds a festive flair and makes them look extra special. Once decorated, return the truffles to the refrigerator until the chocolate is fully set. This usually takes about 15-20 minutes. When they’re ready, you’ll have a batch of stunning Mini Red Velvet Cheesecake Truffles that are just begging to be devoured!
Tips for Success
- Ensure your cream cheese is at room temperature for easy mixing.
- Use a cookie scoop for uniform truffle sizes; it makes rolling easier!
- Don’t skip the chilling step; it’s crucial for the right texture.
- Experiment with different chocolate coatings for a unique twist.
- Store truffles in an airtight container to keep them fresh and delicious.
Equipment Needed
- Mixing bowl: A large bowl for combining ingredients. A sturdy glass or ceramic bowl works well.
- Spatula or spoon: For mixing the truffle mixture. A sturdy wooden spoon is a great alternative.
- Baking sheet: To chill the truffles. You can use any flat surface lined with parchment paper.
- Microwave-safe bowl: For melting chocolate. A glass bowl is perfect for this task.
- Fork: To dip the truffles. A slotted spoon can also do the trick!
Variations
- Chocolate Lovers: Swap the white chocolate for dark or milk chocolate for a richer flavor.
- Nutty Twist: Add crushed walnuts or pecans to the truffle mixture for a delightful crunch.
- Gluten-Free Option: Use gluten-free red velvet cake mix or make your own gluten-free red velvet cake from scratch.
- Vegan Version: Substitute cream cheese with a vegan cream cheese alternative and use dairy-free chocolate for dipping.
- Flavor Infusion: Experiment with different extracts like almond or hazelnut for a unique flavor profile.
Serving Suggestions
- Pair these Mini Red Velvet Cheesecake Truffles with a cup of hot cocoa or coffee for a cozy treat.
- Serve them on a decorative platter for a stunning presentation at parties or gatherings.
- For a festive touch, add fresh berries or whipped cream alongside the truffles.
- Consider packaging them in cute boxes as delightful gifts for friends and family.
FAQs about Mini Red Velvet Cheesecake Truffles
Can I use store-bought red velvet cake for these truffles?
Absolutely! Using store-bought red velvet cake can save you time and still deliver delicious results. Just crumble it up and follow the recipe as usual.
How long do Mini Red Velvet Cheesecake Truffles last?
These truffles can be stored in an airtight container in the refrigerator for up to a week. They’re perfect for making ahead of time!
Can I freeze the truffles?
Yes, you can freeze them! Just make sure they’re in a single layer on a baking sheet until frozen, then transfer them to an airtight container. They’ll keep for about a month.
What can I substitute for cream cheese?
If you’re looking for a dairy-free option, try using a vegan cream cheese alternative. It works wonderfully in these Mini Red Velvet Cheesecake Truffles!
Can I make these truffles without chocolate?
While chocolate adds a lovely sweetness, you can roll the truffles in crushed nuts or coconut for a different texture and flavor. Get creative!
Final Thoughts
Creating these Mini Red Velvet Cheesecake Truffles is more than just a cooking project; it’s a delightful experience that brings joy to both the maker and the eater. Each bite is a celebration of flavors, combining the rich essence of red velvet with the creamy goodness of cheesecake. Whether you’re sharing them at a gathering or enjoying them during a quiet moment, these truffles are sure to bring smiles. Plus, they’re a fantastic way to involve your family in the kitchen. So, roll up your sleeves and dive into this sweet adventure, you won’t regret it!
Print
Mini Red Velvet Cheesecake Truffles: A Sweet Delight!
- Prep Time: 20 minutes
- Cook Time: 0 minutes
- Total Time: 50 minutes
- Yield: 24 truffles 1x
- Category: Dessert
- Method: No-Bake
- Cuisine: American
- Diet: Vegetarian
Description
Mini Red Velvet Cheesecake Truffles are bite-sized treats that combine the rich flavors of red velvet cake and creamy cheesecake, perfect for any occasion.
Ingredients
- 1 cup red velvet cake crumbs
- 8 oz cream cheese, softened
- 1/2 cup powdered sugar
- 1 tsp vanilla extract
- 1 cup white chocolate chips
- 1 tbsp vegetable oil
- Red sprinkles for decoration
Instructions
- In a bowl, mix red velvet cake crumbs, softened cream cheese, powdered sugar, and vanilla extract until well combined.
- Roll the mixture into small balls and place them on a baking sheet lined with parchment paper.
- Chill the truffles in the refrigerator for about 30 minutes.
- In a microwave-safe bowl, melt the white chocolate chips with vegetable oil until smooth.
- Dip each truffle into the melted chocolate, allowing excess to drip off.
- Place the dipped truffles back on the parchment paper and sprinkle with red sprinkles.
- Refrigerate until the chocolate is set, then serve and enjoy!
Notes
- Make sure the cream cheese is at room temperature for easier mixing.
- Store truffles in an airtight container in the refrigerator for up to a week.
- Feel free to use dark or milk chocolate instead of white chocolate for dipping.
Nutrition
- Serving Size: 1 truffle
- Calories: 120
- Sugar: 10g
- Sodium: 50mg
- Fat: 7g
- Saturated Fat: 4g
- Unsaturated Fat: 2g
- Trans Fat: 0g
- Carbohydrates: 12g
- Fiber: 0g
- Protein: 2g
- Cholesterol: 15mg