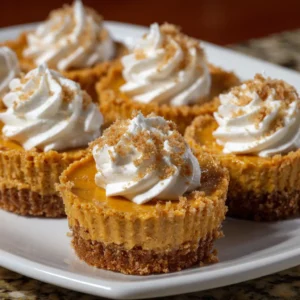
Introduction to No-Bake Pumpkin Pie Cheesecake Cups
As the leaves turn and the air gets crisp, I find myself craving all things pumpkin. That’s why I’m excited to share my No-Bake Pumpkin Pie Cheesecake Cups with you! These delightful treats are not only easy to whip up, but they also bring the cozy flavors of fall right to your table. Perfect for busy moms and professionals, this recipe is a quick solution for those last-minute gatherings or a sweet way to impress your loved ones. Trust me, once you try these, they’ll become a seasonal favorite!
Why You’ll Love This No-Bake Pumpkin Pie Cheesecake Cups
These No-Bake Pumpkin Pie Cheesecake Cups are a dream come true for anyone short on time but big on flavor. They come together in just 20 minutes, leaving you with more time to enjoy the season. Plus, the creamy pumpkin filling paired with a crunchy crust is a match made in dessert heaven. You’ll love how effortlessly they impress guests, making you the star of any fall gathering!
Ingredients for No-Bake Pumpkin Pie Cheesecake Cups
Gathering the right ingredients is half the fun of cooking! For these No-Bake Pumpkin Pie Cheesecake Cups, you’ll need a few simple staples that come together to create a delightful dessert.
- Graham cracker crumbs: These form the base of your crust, adding a sweet crunch. You can use store-bought or crush your own for a fresher taste.
- Unsalted butter: Melted butter binds the crumbs together, giving your crust that perfect texture. If you’re looking for a lighter option, coconut oil works well too!
- Cream cheese: This is the star of the filling, providing a rich and creamy texture. Make sure it’s softened for easy mixing; nobody wants lumps in their cheesecake!
- Pumpkin puree: The heart of this recipe! It brings that classic fall flavor. Canned pumpkin is convenient, but homemade puree can elevate your dish.
- Powdered sugar: This sweetens the filling without the graininess of granulated sugar. You can adjust the sweetness to your liking, or use a sugar substitute if needed.
- Vanilla extract: A splash of vanilla enhances the flavors beautifully. Opt for pure vanilla extract for the best taste.
- Pumpkin pie spice: This blend of spices adds warmth and depth. If you don’t have it on hand, a mix of cinnamon, nutmeg, and ginger will do the trick!
- Whipped cream: Light and fluffy, it’s folded into the filling for a dreamy texture. You can use store-bought or whip your own for a fresher touch.
For exact measurements, check the bottom of the article where you can find everything you need for printing. Happy cooking!
How to Make No-Bake Pumpkin Pie Cheesecake Cups
Now that we have our ingredients ready, let’s dive into the fun part—making these No-Bake Pumpkin Pie Cheesecake Cups! Follow these simple steps, and you’ll have a delicious dessert in no time.
Step 1: Prepare the Crust
Start by grabbing a mixing bowl. Combine the graham cracker crumbs and melted butter. Mix until everything is well combined. The mixture should resemble wet sand.
Next, take your serving cups and press the crumb mixture firmly into the bottom. This creates a sturdy crust that holds everything together. Don’t be shy—use the back of a spoon to pack it down well!
Step 2: Make the Pumpkin Cheesecake Filling
In a separate bowl, beat the softened cream cheese until it’s smooth and creamy. This step is crucial; nobody wants a lumpy filling!
Now, add the pumpkin puree, powdered sugar, vanilla extract, and pumpkin pie spice. Mix until everything is well blended. The colors should be vibrant and inviting, just like fall!
Gently fold in the whipped cream. This adds a lightness to the filling. Be careful not to overmix; you want to keep that airy texture!
Step 3: Assemble the Cups
It’s time to layer! Spoon the pumpkin cheesecake filling over the crust in each cup. Fill them generously, but leave a little room at the top for a dollop of whipped cream later.
As you layer, feel free to get creative. You can even swirl the filling a bit for a fun look. Your guests will be impressed by the beautiful presentation!
Step 4: Chill and Serve
Once all the cups are filled, cover them with plastic wrap and pop them in the refrigerator. Let them chill for at least 2 hours. This helps the flavors meld together and sets the filling.
When you’re ready to serve, top each cup with a generous dollop of whipped cream and a sprinkle of pumpkin pie spice. It’s the perfect finishing touch!
Tips for Success
- Make sure your cream cheese is at room temperature for easy mixing.
- For a firmer filling, chill the cups longer than 2 hours.
- Use a piping bag for a neat whipped cream topping.
- Experiment with flavored whipped cream, like cinnamon or maple!
- Don’t skip the pumpkin pie spice; it’s essential for that cozy flavor.
Equipment Needed
- Mixing bowls: A couple of medium-sized bowls will do. You can also use a large measuring cup if you’re short on space.
- Whisk or electric mixer: A whisk works fine, but an electric mixer saves time and effort.
- Serving cups: Any small cups or jars will work. Mason jars add a charming touch!
- Spoon: For mixing and layering the filling. A spatula is great for folding in the whipped cream.
Variations
- Chocolate Drizzle: Add a drizzle of melted chocolate on top for a decadent twist. It pairs beautifully with the pumpkin flavor!
- Nutty Crunch: Mix in some chopped pecans or walnuts into the crust for added texture and flavor. It gives a delightful crunch!
- Maple Syrup Sweetener: Substitute powdered sugar with maple syrup for a natural sweetness and a hint of maple flavor.
- Dairy-Free Option: Use dairy-free cream cheese and coconut whipped cream for a delicious vegan version that everyone can enjoy.
- Spiced Rum Kick: Add a splash of spiced rum to the filling for an adult-only version that brings warmth and depth to the dessert.
Serving Suggestions
- Pair with Coffee: A warm cup of coffee or spiced chai complements the creamy pumpkin flavors beautifully.
- Garnish with Fresh Herbs: A sprig of mint or a sprinkle of cinnamon adds a pop of color and freshness.
- Serve with Seasonal Fruits: Slices of apple or pear make a lovely side that enhances the fall theme.
- Use Decorative Cups: Presenting in mason jars or festive cups adds charm to your dessert table.
FAQs about No-Bake Pumpkin Pie Cheesecake Cups
As you embark on your journey to create these delightful No-Bake Pumpkin Pie Cheesecake Cups, you might have a few questions. Here are some common queries I’ve encountered, along with helpful answers!
Can I make these cups in advance?
Absolutely! These No-Bake Pumpkin Pie Cheesecake Cups can be made a day ahead. Just keep them covered in the fridge until you’re ready to serve. This actually enhances the flavors!
What can I use instead of graham cracker crumbs?
If you’re looking for alternatives, crushed cookies like Oreos or digestive biscuits work well. You can even use crushed nuts for a gluten-free option!
How long do these cups last in the fridge?
These treats can last up to 3 days in the fridge. Just make sure they’re covered to keep them fresh and delicious!
Can I freeze the No-Bake Pumpkin Pie Cheesecake Cups?
Yes, you can freeze them! Just be sure to cover them tightly. When you’re ready to enjoy, let them thaw in the fridge overnight.
What can I substitute for pumpkin puree?
If you can’t find pumpkin puree, you can use butternut squash puree or sweet potato puree. Both options will give you that lovely fall flavor!
Final Thoughts
Creating these No-Bake Pumpkin Pie Cheesecake Cups is more than just making a dessert; it’s about embracing the warmth of fall and sharing joy with loved ones. Each cup is a little celebration, a sweet reminder of cozy gatherings and laughter around the table. I love how easy they are to prepare, allowing me to spend more time with family and friends. Plus, the delightful combination of creamy pumpkin and crunchy crust is simply irresistible! So, gather your ingredients, and let’s make some memories together this season. You won’t regret it!
Print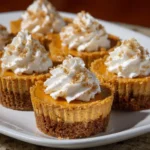
No-Bake Pumpkin Pie Cheesecake Cups You’ll Love This Fall!
- Prep Time: 20 minutes
- Cook Time: 0 minutes
- Total Time: 2 hours 20 minutes
- Yield: 4 servings 1x
- Category: Dessert
- Method: No-Bake
- Cuisine: American
- Diet: Vegetarian
Description
Delicious and easy-to-make no-bake pumpkin pie cheesecake cups, perfect for fall gatherings.
Ingredients
- 1 cup graham cracker crumbs
- 1/4 cup unsalted butter, melted
- 1 cup cream cheese, softened
- 1 cup pumpkin puree
- 1/2 cup powdered sugar
- 1 teaspoon vanilla extract
- 1 teaspoon pumpkin pie spice
- 1 cup whipped cream
Instructions
- In a bowl, combine graham cracker crumbs and melted butter until well mixed.
- Press the mixture into the bottom of serving cups to form the crust.
- In another bowl, beat the cream cheese until smooth.
- Add pumpkin puree, powdered sugar, vanilla extract, and pumpkin pie spice to the cream cheese and mix until well combined.
- Fold in the whipped cream gently until fully incorporated.
- Layer the pumpkin cheesecake mixture over the crust in the cups.
- Chill in the refrigerator for at least 2 hours before serving.
- Top with additional whipped cream and a sprinkle of pumpkin pie spice if desired.
Notes
- Make sure the cream cheese is softened for easier mixing.
- These cups can be made a day in advance for convenience.
- Feel free to adjust the sweetness to your preference.
Nutrition
- Serving Size: 1 cup
- Calories: 350
- Sugar: 20g
- Sodium: 150mg
- Fat: 22g
- Saturated Fat: 10g
- Unsaturated Fat: 8g
- Trans Fat: 0g
- Carbohydrates: 30g
- Fiber: 2g
- Protein: 4g
- Cholesterol: 50mg