Introduction to Red Velvet Peppermint Thumbprints
As the holiday season approaches, I find myself craving something festive and delightful. That’s where these Red Velvet Peppermint Thumbprints come in! They’re not just cookies; they’re little bites of joy that bring warmth to any gathering. If you’re a busy mom or professional like me, you’ll appreciate how quick and easy this recipe is. With just a handful of ingredients, you can whip up a batch that will impress your loved ones. Trust me, the combination of rich red velvet and refreshing peppermint is simply irresistible!
Why You’ll Love This Red Velvet Peppermint Thumbprints
These Red Velvet Peppermint Thumbprints are a dream come true for busy kitchens! They come together in just 32 minutes, making them perfect for last-minute holiday gatherings. The vibrant red color and creamy peppermint filling will have everyone reaching for seconds. Plus, they’re a delightful way to spread holiday cheer without spending hours in the kitchen. Trust me, these cookies will become a cherished tradition in your home!
Ingredients for Red Velvet Peppermint Thumbprints
Gathering the right ingredients is the first step to creating these delightful Red Velvet Peppermint Thumbprints. Here’s what you’ll need:
- All-purpose flour: This is the base of your cookies, providing structure and texture.
- Cocoa powder: Adds a rich chocolate flavor that complements the red velvet beautifully.
- Baking soda: This leavening agent helps the cookies rise and become fluffy.
- Salt: Just a pinch enhances the sweetness and balances flavors.
- Unsalted butter: Softened butter creates a creamy texture and rich taste.
- Granulated sugar: Sweetens the cookies and contributes to their delightful crunch.
- Large egg: Acts as a binder, helping the ingredients come together.
- Red food coloring: Gives the cookies their signature vibrant hue, making them festive.
- Vanilla extract: Adds warmth and depth to the flavor profile.
- Peppermint extract: Infuses a refreshing minty taste that’s perfect for the holidays.
- Powdered sugar: Used for the creamy filling, it gives a smooth texture.
- Milk: Helps achieve the right consistency for the filling.
- Peppermint extract (for filling): A little extra for that delightful peppermint punch.
For those looking to switch things up, consider using gluten-free flour for a gluten-free version or coconut oil instead of butter for a dairy-free option. You can find all the exact measurements at the bottom of the article, ready for printing!
How to Make Red Velvet Peppermint Thumbprints
Now that you have your ingredients ready, let’s dive into the fun part: making these delightful Red Velvet Peppermint Thumbprints! Follow these simple steps, and you’ll have a batch of cookies that will make your kitchen smell heavenly.
Step 1: Preheat the Oven
First things first, preheat your oven to 350°F (175°C). Preheating is crucial because it ensures even baking. If you skip this step, your cookies might end up unevenly cooked. Trust me, no one wants a gooey center when they’re expecting a soft, chewy cookie!
Step 2: Prepare the Dry Ingredients
In a medium bowl, whisk together the all-purpose flour, cocoa powder, baking soda, and salt. This step is essential for evenly distributing the leavening agent and flavors. Make sure there are no lumps in the cocoa powder. A smooth mixture will lead to perfectly textured cookies!
Step 3: Cream the Butter and Sugar
In a large bowl, cream together the softened unsalted butter and granulated sugar until the mixture is light and fluffy. This usually takes about 2-3 minutes with an electric mixer. The air you incorporate here is what makes your cookies tender and delightful. Don’t rush this step; it’s worth the wait!
Step 4: Mix in the Wet Ingredients
Next, add the large egg, red food coloring, vanilla extract, and peppermint extract to the butter mixture. Mix until everything is well combined. The vibrant red color will start to shine through, and the peppermint aroma will fill your kitchen. It’s like a holiday hug in a bowl!
Step 5: Combine Dry and Wet Ingredients
Gradually add the dry ingredients to the wet mixture. I like to do this in three parts, mixing gently after each addition. This helps prevent flour clouds and ensures a smooth dough. You want everything to come together without overmixing, which can make the cookies tough.
Step 6: Shape the Cookies
Now it’s time to shape your cookies! Roll the dough into 1-inch balls and place them on a baking sheet lined with parchment paper. Use your thumb to make an indentation in the center of each ball. This is where the peppermint filling will go, so make sure it’s deep enough!
Step 7: Bake the Cookies
Bake your cookies in the preheated oven for 10-12 minutes. Keep an eye on them; they should look set but still soft in the center. A good tip is to take them out when the edges are firm but the middle still looks slightly underbaked. They’ll continue to firm up as they cool!
Step 8: Prepare the Peppermint Filling
While the cookies are cooling, let’s whip up the peppermint filling. In a small bowl, mix the powdered sugar, milk, and peppermint extract until smooth. You want a creamy consistency that’s easy to pipe or spoon into the cookie indentations. If it’s too thick, add a splash more milk!
Step 9: Fill the Thumbprints
Finally, fill the thumbprint indentations with your peppermint cream filling. You can use a piping bag for a neat look or simply spoon it in. Don’t be shy; a generous dollop makes each cookie even more delightful. And there you have it—your Red Velvet Peppermint Thumbprints are ready to shine!
Tips for Success
- Make sure your butter is softened for easy creaming.
- Use a cookie scoop for uniform cookie sizes.
- Chill the dough for 15 minutes if it feels too sticky.
- Don’t skip the indentation; it’s key for holding the filling.
- Experiment with crushed candy canes for a festive touch!
Equipment Needed
- Baking sheet: A standard one works, but a silicone mat can prevent sticking.
- Parchment paper: Great for easy cleanup and preventing cookies from sticking.
- Mixing bowls: Use a large bowl for wet ingredients and a medium one for dry.
- Electric mixer: A hand mixer is perfect for creaming butter and sugar.
- Cookie scoop: This helps in making uniform cookie sizes.
Variations of Red Velvet Peppermint Thumbprints
- Gluten-Free: Substitute all-purpose flour with a gluten-free blend for a delicious gluten-free option.
- Dairy-Free: Use coconut oil or a dairy-free butter alternative instead of unsalted butter.
- Chocolate Lovers: Add chocolate chips to the dough for an extra chocolatey twist.
- Nutty Flavor: Incorporate finely chopped walnuts or pecans into the dough for added texture.
- Mint Chocolate: Use chocolate mint extract instead of regular peppermint for a unique flavor.
Serving Suggestions for Red Velvet Peppermint Thumbprints
- Pair these cookies with a warm cup of hot cocoa for a cozy treat.
- Serve alongside a scoop of vanilla ice cream for a delightful dessert.
- Present them on a festive platter, garnished with crushed candy canes.
- Enjoy with a glass of cold milk for a classic combination.
FAQs about Red Velvet Peppermint Thumbprints
Can I make these cookies ahead of time?
Absolutely! You can prepare the dough a day in advance and store it in the fridge. Just let it sit at room temperature for a few minutes before rolling into balls. You can also bake the cookies ahead and fill them with the peppermint cream later.
What can I use instead of peppermint extract?
If you’re not a fan of peppermint, you can substitute it with vanilla extract or almond extract for a different flavor profile. Just remember, it won’t have that festive minty kick!
How should I store the Red Velvet Peppermint Thumbprints?
Store your cookies in an airtight container at room temperature for up to a week. If you want to keep them fresh longer, you can freeze them without the filling. Just thaw and fill when you’re ready to enjoy!
Can I decorate these cookies?
<pDefinitely! You can sprinkle crushed candy canes on top of the filling for a festive touch. Drizzling melted chocolate over the cookies also adds a delicious twist and makes them look extra special.
What’s the best way to serve these cookies?
These Red Velvet Peppermint Thumbprints are perfect for holiday parties! Serve them on a beautiful platter with a side of hot cocoa or coffee. They’re sure to be a hit with family and friends!
Final Thoughts
Making Red Velvet Peppermint Thumbprints is more than just baking; it’s about creating memories. The vibrant colors and delightful flavors bring a sense of joy to any gathering. I love how these cookies can transform a simple afternoon into a festive celebration. Whether you’re sharing them with family or gifting them to friends, they’re sure to spread smiles. Plus, the ease of preparation means you can enjoy the process without stress. So, roll up your sleeves, embrace the holiday spirit, and let these cookies be a sweet addition to your celebrations!
Print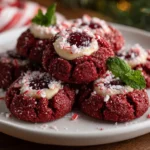
Red Velvet Peppermint Thumbprints: Try This Irresistible Recipe!
- Prep Time: 20 minutes
- Cook Time: 12 minutes
- Total Time: 32 minutes
- Yield: 24 cookies 1x
- Category: Dessert
- Method: Baking
- Cuisine: American
- Diet: Vegetarian
Description
Delicious red velvet cookies filled with peppermint cream, perfect for the holiday season.
Ingredients
- 1 1/2 cups all-purpose flour
- 1/2 cup cocoa powder
- 1 teaspoon baking soda
- 1/2 teaspoon salt
- 1/2 cup unsalted butter, softened
- 1 cup granulated sugar
- 1 large egg
- 1 tablespoon red food coloring
- 1 teaspoon vanilla extract
- 1/2 teaspoon peppermint extract
- 1 cup powdered sugar
- 2 tablespoons milk
- 1/2 teaspoon peppermint extract (for filling)
Instructions
- Preheat the oven to 350°F (175°C).
- In a bowl, whisk together flour, cocoa powder, baking soda, and salt.
- In another bowl, cream together the butter and granulated sugar until light and fluffy.
- Add the egg, red food coloring, vanilla extract, and peppermint extract to the butter mixture and mix well.
- Gradually add the dry ingredients to the wet ingredients and mix until combined.
- Roll the dough into 1-inch balls and place them on a baking sheet lined with parchment paper.
- Make an indentation in the center of each ball using your thumb.
- Bake for 10-12 minutes, then let cool.
- In a small bowl, mix powdered sugar, milk, and peppermint extract to make the filling.
- Fill the thumbprint indentations with the peppermint cream filling.
Notes
- For a stronger peppermint flavor, increase the amount of peppermint extract in the filling.
- Store cookies in an airtight container for up to a week.
- These cookies can be decorated with crushed candy canes for added festive flair.
Nutrition
- Serving Size: 1 cookie
- Calories: 120
- Sugar: 10g
- Sodium: 50mg
- Fat: 5g
- Saturated Fat: 3g
- Unsaturated Fat: 2g
- Trans Fat: 0g
- Carbohydrates: 18g
- Fiber: 1g
- Protein: 2g
- Cholesterol: 15mg