The tantalizing scent of rich, velvety chocolate wafts through the air, wrapping you in a warm embrace that transports you back to lazy afternoons at Grandma’s kitchen table. Every bite of Grandma’s Chocolate Pie feels like a gentle caress, the creamy filling melting effortlessly in your mouth, leaving an indulgent whisper of sweetness on your palate. Lush, dark chocolate fills the pie, with a contrasting crispness from the flaky crust, creating a symphony of flavors that dances delightfully. The moment you take a slice, the top glistens, a crown of whipped cream promising decadence and joy, inviting you to take another bite.
Grandma’s chocolate pie isn’t just a dessert; it is a memory, a cherished token of unconditional love and warmth from the heart. Each spoonful unleashes waves of nostalgia—an explosion of gooey chocolate, enhanced by hints of butter and vanilla that quench any chocolate craving. The crisp crust cradles the filling perfectly, making every slice an experience; a treasured recipe passed down with tales of family gatherings, laughter, and unforgettable moments.
Why You’ll Love This Chocolate Pie
This chocolate pie stands out not only for its exhilarating taste but also for the comfort it brings. Each bite encapsulates the joy of reliving those cherished memories, reminding you of the warmth of family and the sweet delights of childhood. It is the star of any gathering, perfect for birthdays, holiday feasts, or simply as an after-dinner indulgence on a cozy evening.
Imagine serving this to friends, their eyes lighting up in delight as they savor the luscious layers of chocolate bliss alongside a delightful contrast of textures. It captivates palates young and old, ensuring smiles all around. Packed with flavor, this pie delivers a splendid richness that lingers, making it a comforting choice that truly satisfies.
Preparation Phase & Tools to Use
Before you delve into the deliciousness of Grandma’s Chocolate Pie, it’s essential to gather a few kitchen companions.
- Mixing Bowl: A spacious bowl allows for easy mixing, ensuring all your ingredients come together harmoniously.
- Whisk: A whisk enables smooth incorporation of dry ingredients with liquid, preventing lumps that could mar that silky texture.
- Saucepan: Choose a heavy-bottomed saucepan for even heat distribution, which is key to achieving that perfect consistency.
- Pie Dish: A classic pie dish accommodates your crust and filling and delivers a beautiful presentation.
Preparation Tips:
- Measure ingredients accurately for best results.
- Take your time stirring to avoid scorching the base, which can alter the flavor.
- Let the pie cool to room temperature before chilling to enhance the setting process.
Ingredients for Grandma’s Chocolate Pie
- 1 pre-made pie crust: The convenience of a pre-made crust saves time, especially when you crave that rich chocolate filling! If you’d like a homemade experience, try making a classic shortcrust pastry.
- 1 cup granulated sugar: Sweetness balances the rich cocoa. Use brown sugar for a hint of molasses flavor if desired.
- 1/3 cup unsweetened cocoa powder: The heart and soul of the pie, rich cocoa powder brings that deep chocolate flavor. Dutch-processed cocoa can give a milder taste.
- 1/4 cup cornstarch: This ingredient thickens the filling, ensuring a luscious pie experience. Arrowroot can be a gluten-free substitute if needed.
- 1/4 teaspoon salt: A pinch of salt amplifies sweetness and enhances flavor depth.
- 2 3/4 cups milk: Whole milk gives creaminess; consider almond milk or oat milk for a dairy-free option.
- 2 tablespoons butter: This adds richness, with vegan butter serving as a suitable alternative.
- 1 teaspoon vanilla extract: Vanilla elevates flavors beautifully; feel free to use homemade vanilla extract for a personal touch.
- 1 cup whipped cream: A classic topping that balances the pie’s richness; homemade whipped cream brightens things up.
How to Make Grandma’s Chocolate Pie
-
Preheat: Begin by preheating your oven to 350°F (175°C). Place the pie crust in a pie dish and bake it according to package instructions until golden brown. This crust acts as a delightful shell for your treasure within.
-
Mix Dry Ingredients: In a saucepan, combine the granulated sugar, cocoa powder, cornstarch, and salt. Whisk together until evenly mixed, ensuring a smooth chocolate base.
-
Add Milk: Gradually whisk in the milk. With patience, keep stirring to incorporate flawlessly; this will prevent lumps from forming.
-
Cook It Up: Over medium heat, stir constantly until the mixture starts to thicken and bubbles emerge, exuding an enticing aroma. Allow passion to guide you in this aromatic dance.
-
Finishing Touches: Once thickened, remove the saucepan from heat. Stir in the butter and vanilla extract until thoroughly combined, creating a silky texture.
-
Pour It In: Pour the luscious chocolate filling into the prepared pie crust, letting it settle and fill every nook and cranny.
-
Chill: Cover and refrigerate for at least 2 hours until fully set. This waiting period might feel eternal, but the promise of sweet chocolate is worth it!
-
Serve: Finally, slice and serve the pie topped with a generous dollop of whipped cream, a true crowning glory to this delectable dessert.
Chef’s Notes & Helpful Tips
Make-Ahead Tips: Prepare the pie a day in advance for a stress-free hosting experience. The flavors deepen as it sits overnight.
Cooking Alternatives: If you want to utilize an air fryer, consider using mini pie tins or an appropriate baking dish at 320°F for 25-30 minutes.
Customization Ideas: Try folding in chocolate chips into the filling for an extra burst of chocolate. You could also sprinkle sea salt on the whipped cream for a delightful sweet-and-salty contrast.
Common Mistakes to Avoid
- Lump Formation: Ensure you whisk the milk in gradually to avoid lumps in the filling.
- Overheating the Mixture: Keep the heat medium. Cooking it too fast might scorch your chocolate, leading to bitterness.
- Under-Chilling: Don’t skip the chill time! A set filling makes all the difference in taste and consistency, preventing a runny pie.
What to Serve With Grandma’s Chocolate Pie
• Fresh Berries: Serve with strawberries, raspberries, or blueberries for that fresh, tangy bite.
• Coffee or Espresso: A warm cup of coffee balances the sweetness and enhances the chocolate flavor.
• Ice Cream: A scoop of vanilla or mint chocolate chip ice cream makes a delightful accompaniment.
• Chocolate Sauce: Drizzling chocolate sauce over the whipped cream adds an extra touch of decadence.
• Nuts: Chopped toasted pecans or walnuts can add a pleasant crunch and a nutty flavor contrast while playing on texture.
• Chocolate Shavings: Elegant and visually appealing, chocolate shavings on top of whipped cream heighten the dessert experience.
Storage & Reheating Instructions
Store any leftover pie in the refrigerator for up to 4-5 days. Be sure to cover it or keep it in an airtight container to maintain freshness. If you’d like to freeze, wrap slices tightly in plastic wrap and aluminum foil; it will keep well for about a month. Thaw overnight in the refrigerator before serving again, and add fresh whipped cream to revive its beauty!
Estimated Nutrition Information
- Calories: Approximately 360 per slice
- Fat: 18g
- Carbohydrates: 50g
- Protein: 5g
Values are estimates and can vary based on specific ingredients used.
FAQs
1. Can I make this pie dairy-free?
Absolutely! Substitute the whole milk with almond milk, coconut milk, or any other plant-based milk, and use vegan butter for the filling.
2. How can I make the pie crust from scratch?
A simple pie crust can be made with 1 ¼ cups of all-purpose flour, ½ cup of cold unsalted butter, 3 tablespoons of sugar, and 2-4 tablespoons of ice water. Mix the dry ingredients, cut in the butter, and add water until combined.
3. How do I make the whipped cream from scratch?
Beat 1 cup of heavy cream with 2 tablespoons of sugar and 1 teaspoon of vanilla extract until soft peaks form for the perfect topping.
4. Can I use sweetened cocoa powder?
While you can, it may make the pie overly sweet. Unsweetened cocoa powder offers a more balanced flavor.
5. How do I prevent the filling from becoming grainy?
Slowly incorporating the milk into the dry ingredients while whisking ensures smooth integration and avoids texture issues.
Conclusion
Every slice of Grandma’s Chocolate Pie is not just a dessert but a heartfelt homage to love, family, and warmth. The velvety smooth filling and crisp crust come together in a symphony, reminding us of cherished memories with every bite. Give in to nostalgia and treat yourself to this timeless recipe that will surely entice your friends and family. Bake this pie, and let the aroma of chocolate evoke sweet moments that last a lifetime—your taste buds will thank you!
Print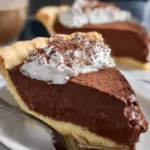
Grandma’s Chocolate Pie
- Prep Time: 15 minutes
- Cook Time: 20 minutes
- Total Time: 35 minutes
- Yield: 8 servings 1x
- Category: Dessert
- Method: Baking
- Cuisine: American
- Diet: Vegetarian
Description
Indulge in Grandma’s Chocolate Pie, a rich and creamy dessert with a crisp crust, perfect for reliving childhood memories.
Ingredients
- 1 pre-made pie crust
- 1 cup granulated sugar
- 1/3 cup unsweetened cocoa powder
- 1/4 cup cornstarch
- 1/4 teaspoon salt
- 2 3/4 cups milk
- 2 tablespoons butter
- 1 teaspoon vanilla extract
- 1 cup whipped cream
Instructions
- Preheat your oven to 350°F (175°C) and bake the pie crust until golden brown.
- Mix the granulated sugar, cocoa powder, cornstarch, and salt in a saucepan.
- Add the milk gradually and whisk until smooth.
- Cook over medium heat, stirring constantly until the mixture thickens.
- Remove from heat and stir in the butter and vanilla extract.
- Pour the filling into the baked pie crust.
- Chill for at least 2 hours until fully set.
- Serve topped with whipped cream.
Notes
Let the pie cool completely before chilling for best results. Can be made a day in advance.
Nutrition
- Serving Size: 1 slice
- Calories: 360
- Sugar: 25g
- Sodium: 100mg
- Fat: 18g
- Saturated Fat: 10g
- Unsaturated Fat: 8g
- Trans Fat: 0g
- Carbohydrates: 50g
- Fiber: 3g
- Protein: 5g
- Cholesterol: 30mg


")