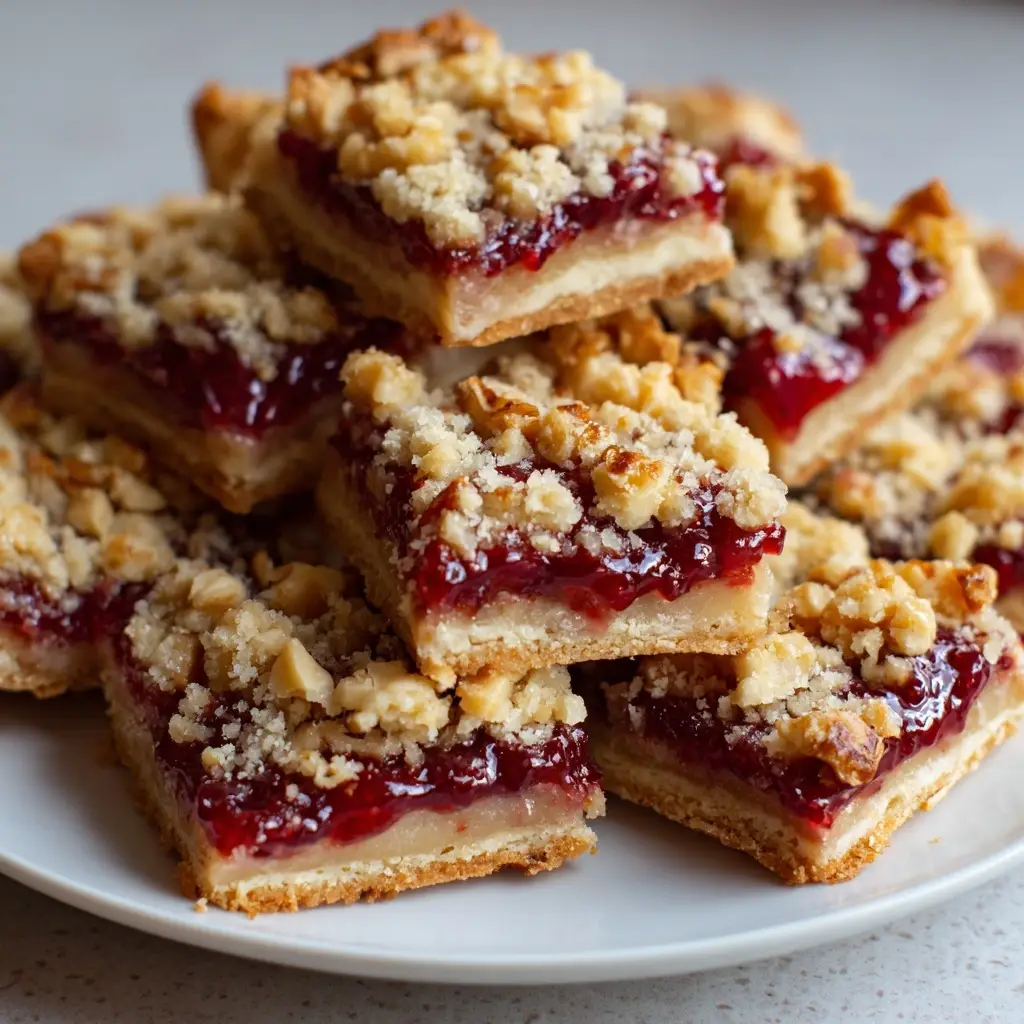
Introduction to Traditional Thumb Bars
As a busy mom, I know how precious time can be, especially when it comes to whipping up something delicious. That’s where Traditional Thumb Bars come in! These delightful treats are not only quick to make, but they also bring a smile to everyone’s face. With a buttery crust and a fruity filling, they’re perfect for any occasion—be it a family gathering or a simple afternoon snack. Plus, they’re a fantastic way to impress your loved ones without spending hours in the kitchen. Trust me, once you try these, they’ll become a staple in your home!
Why You’ll Love This Traditional Thumb Bars
These Traditional Thumb Bars are a dream come true for busy cooks like us! They come together in just 15 minutes of prep time, making them a quick solution for unexpected guests or a sweet treat after dinner. The buttery crust paired with your favorite fruit preserves creates a flavor explosion that’s hard to resist. Plus, they’re easy to cut into squares, making serving a breeze. What’s not to love?
Ingredients for Traditional Thumb Bars
Gathering the right ingredients is the first step to creating these delightful Traditional Thumb Bars. Here’s what you’ll need:
- All-purpose flour: This is the backbone of your crust, providing structure and a tender bite.
- Unsalted butter: Softened butter adds richness and flavor. Make sure it’s at room temperature for easy mixing.
- Granulated sugar: This sweetener not only adds sweetness but also helps create that lovely, crumbly texture.
- Salt: Just a pinch enhances the flavors and balances the sweetness of the bars.
- Fruit preserves: Choose your favorite flavor! Whether it’s raspberry, apricot, or strawberry, this is where the magic happens.
- Chopped nuts (optional): If you like a bit of crunch, add some nuts for texture. Walnuts or pecans work beautifully.
Feel free to get creative with your fruit preserves! You can even mix flavors for a unique twist. If you need to make adjustments, you can find the exact measurements at the bottom of the article, ready for printing. Happy baking!
How to Make Traditional Thumb Bars
Now that you have your ingredients ready, let’s dive into the fun part—making these delicious Traditional Thumb Bars! Follow these simple steps, and you’ll have a delightful treat in no time.
Step 1: Preheat the Oven
First things first, preheat your oven to 350°F (175°C). Preheating is crucial because it ensures even baking. If you skip this step, your bars might not cook properly, leading to a soggy bottom. Trust me, no one wants that!
Step 2: Cream the Butter and Sugar
In a mixing bowl, cream together the softened butter and granulated sugar until it’s light and fluffy. This process is key to achieving that perfect texture. The air you incorporate will make your bars tender and melt-in-your-mouth delicious. It should take about 2-3 minutes of mixing.
Step 3: Combine Dry Ingredients
Next, add the all-purpose flour and salt to the butter mixture. Mix until just combined. The flour provides structure, while the salt enhances the sweetness. Be careful not to overmix; we want a tender crust, not a tough one!
Step 4: Prepare the Base
Now, take about two-thirds of the dough and press it firmly into the bottom of a greased 8-inch square baking pan. This forms the base of your bars. Make sure it’s even and well-packed, as this will hold the fruity filling beautifully.
Step 5: Add the Fruit Preserves
Spread your choice of fruit preserves evenly over the crust. Whether you opt for tangy raspberry or sweet apricot, this is where the magic happens! The preserves will bubble and create a luscious layer of flavor that pairs perfectly with the buttery crust.
Step 6: Crumble the Remaining Dough
Take the remaining dough and crumble it over the top of the fruit preserves. This creates a delightful crumb topping that adds texture. It should look like little pebbles scattered across the surface. Don’t worry about it being perfect; rustic is charming!
Step 7: Bake to Perfection
Pop the pan into your preheated oven and bake for 25-30 minutes. Keep an eye on it! You’ll know it’s done when the top is golden brown and the edges are slightly pulling away from the pan. A toothpick inserted in the center should come out clean.
Step 8: Cool and Cut
Once baked, remove the pan from the oven and let it cool completely. This is important! If you cut them too soon, they might fall apart. Once cooled, slice into squares and serve. Enjoy the smiles as your family digs in!
Tips for Success
- Make sure your butter is softened for easy mixing.
- Use a spatula to evenly spread the fruit preserves for a consistent flavor.
- Don’t overmix the dough; it should be just combined for a tender texture.
- Let the bars cool completely before cutting to avoid crumbling.
- Experiment with different fruit preserves for unique flavor combinations!
Equipment Needed
- Mixing bowl: A large bowl for combining ingredients. A sturdy plastic or glass bowl works well.
- Measuring cups and spoons: Essential for accurate ingredient measurements. You can also use a kitchen scale if you prefer.
- 8-inch square baking pan: This is perfect for baking your bars. A round pan can be used in a pinch.
- Spatula: Great for spreading the dough and preserves evenly. A butter knife can work too!
Variations of Traditional Thumb Bars
- Chocolate Thumb Bars: Swap out fruit preserves for chocolate spread or melted chocolate for a decadent twist.
- Nut Butter Bars: Use almond or peanut butter in place of butter for a nutty flavor and added protein.
- Gluten-Free Option: Substitute all-purpose flour with a gluten-free blend to accommodate dietary needs.
- Vegan Version: Replace butter with coconut oil and use a flax egg for a plant-based alternative.
- Seasonal Flavors: Experiment with seasonal fruit preserves like pumpkin spice in the fall or berry blends in the summer.
Serving Suggestions for Traditional Thumb Bars
- Pair with a scoop of vanilla ice cream for a delightful dessert.
- Serve alongside a cup of hot tea or coffee for a cozy afternoon treat.
- Dust with powdered sugar for an elegant presentation.
- Top with fresh berries for a pop of color and freshness.
- Wrap in parchment paper for a charming homemade gift!
FAQs about Traditional Thumb Bars
As you embark on your baking adventure with Traditional Thumb Bars, you might have a few questions. Here are some common queries that can help you along the way:
Can I use different types of fruit preserves?
Absolutely! Feel free to experiment with any flavor you love. Raspberry, apricot, or even mixed berry preserves can add a delightful twist to your bars.
How should I store my Traditional Thumb Bars?
Store them in an airtight container at room temperature for up to a week. If you want to keep them longer, you can freeze them for up to three months!
Can I make these bars gluten-free?
Yes! Simply substitute the all-purpose flour with a gluten-free blend. This way, everyone can enjoy these delicious treats!
What can I serve with Traditional Thumb Bars?
These bars pair wonderfully with a scoop of ice cream or a cup of coffee. They also make a lovely addition to a dessert platter!
Can I add nuts to the recipe?
Definitely! Chopped nuts like walnuts or pecans can be sprinkled on top for added crunch and flavor. Just be sure to let your guests know in case of nut allergies!
Final Thoughts
Making Traditional Thumb Bars is more than just baking; it’s about creating sweet memories in the kitchen. The joy of mixing, spreading, and baking transforms a simple afternoon into a delightful experience. Each bite of these buttery, fruity bars brings a smile, whether shared with family or enjoyed solo with a cup of tea. Plus, the ease of preparation means you can whip them up anytime, making them a go-to recipe for busy days. So, roll up your sleeves, gather your ingredients, and let the aroma of freshly baked bars fill your home with warmth and happiness!
Print
Traditional Thumb Bars: Discover Their Unique Benefits!
- Prep Time: 15 minutes
- Cook Time: 30 minutes
- Total Time: 45 minutes
- Yield: 16 bars 1x
- Category: Dessert
- Method: Baking
- Cuisine: American
- Diet: Vegetarian
Description
Traditional Thumb Bars are a delicious and unique treat that combines a buttery crust with a fruity filling, perfect for any occasion.
Ingredients
- 1 cup all-purpose flour
- 1/2 cup unsalted butter, softened
- 1/4 cup granulated sugar
- 1/4 teaspoon salt
- 1/2 cup fruit preserves (your choice)
- 1/4 cup chopped nuts (optional)
Instructions
- Preheat the oven to 350°F (175°C).
- In a mixing bowl, cream together the butter and sugar until light and fluffy.
- Add the flour and salt, mixing until just combined.
- Press two-thirds of the dough into the bottom of a greased 8-inch square baking pan.
- Spread the fruit preserves evenly over the crust.
- Crumb the remaining dough over the top of the preserves.
- If using, sprinkle chopped nuts on top.
- Bake for 25-30 minutes or until golden brown.
- Allow to cool before cutting into squares.
Notes
- Feel free to experiment with different flavors of fruit preserves.
- These bars can be stored in an airtight container for up to a week.
- For a gluten-free version, substitute all-purpose flour with a gluten-free blend.
Nutrition
- Serving Size: 1 bar
- Calories: 150
- Sugar: 8g
- Sodium: 50mg
- Fat: 7g
- Saturated Fat: 4g
- Unsaturated Fat: 2g
- Trans Fat: 0g
- Carbohydrates: 20g
- Fiber: 1g
- Protein: 2g
- Cholesterol: 20mg