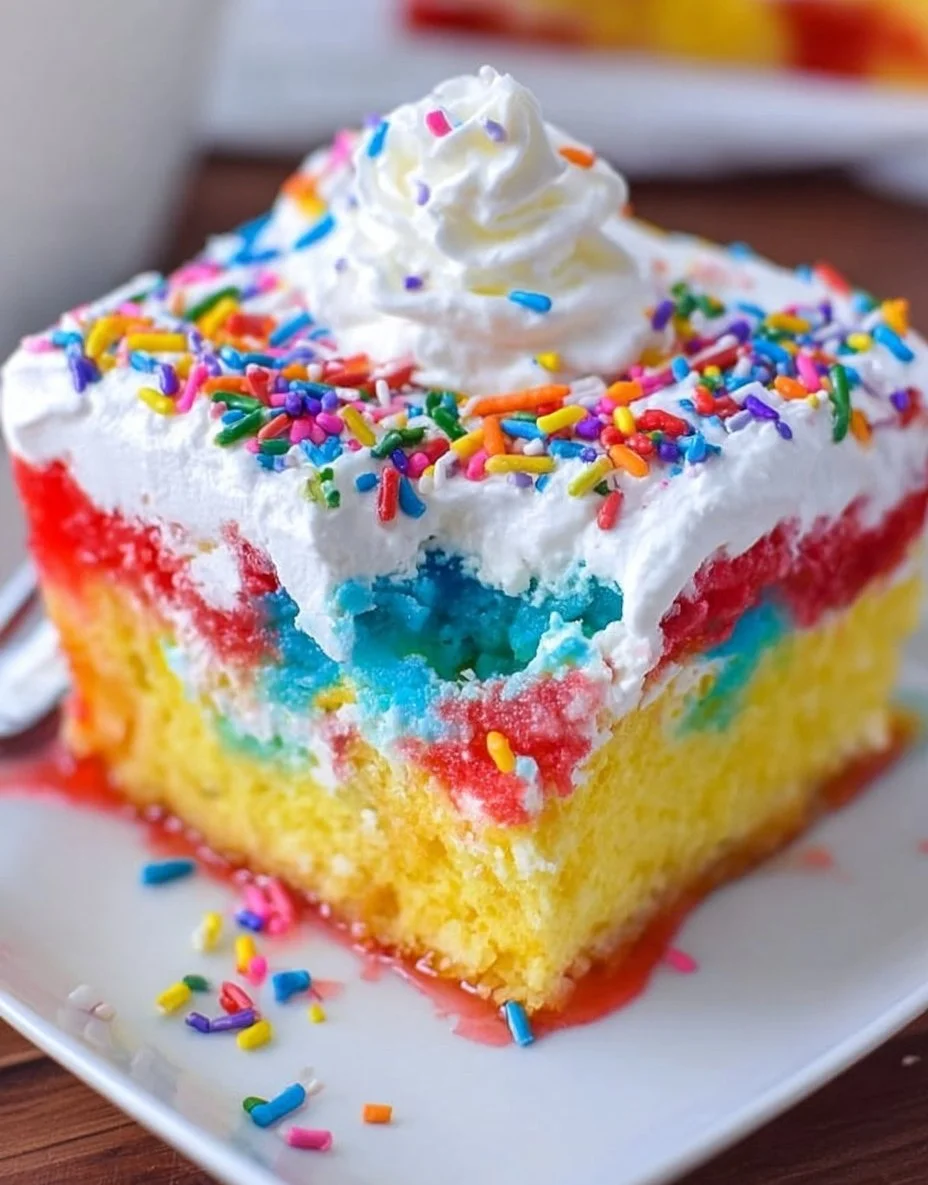
Indulging in a slice of Unicorn Poke Cake feels like stepping into a whimsical world where dessert dreams come true. Imagine a moist, tender yellow cake that cradles a melody of sugary surprises underneath. Each bite unravels layers of creamy, colorful whipped cream that dance on your palate, reminiscent of sweet summer days and glowing rainbows. The playful bursts of vibrant colors and the delightful crunch of rainbow sprinkles elevate this enchanting creation, turning an ordinary dessert into an extraordinary celebration.
As you cut into this magical cake, the intoxicating aroma wafts through the air, teasing your senses with the promise of something wonderfully sweet. Each forkful reveals moist sponge cake interspersed with creamy bursts of sweetness that envelop your taste buds. This isn’t just a dessert; it’s an experience, a canvas of imagination, and a slice of joy that beckons you to share the love with family and friends.
Why You’ll Love This Unicorn Poke Cake
This Unicorn Poke Cake isn’t just visually stunning; it brings a whole lot of joy to your table. Perfect for birthday parties, baby showers, or any occasion that calls for celebration, this cake earns instant affection from both kids and adults alike. Its surprising flavor profile merges the comforting taste of classic yellow cake with an indulgent layer of sweetened condensed milk that soaks in all the goodness, keeping each bite delightfully moist and flavorful.
The appeal lies in its striking presentation and the engaging process of making it. The simple act of poking holes into the cake becomes an invitation to create something fantastic, allowing those you share it with to feel like part of the magic. With every vibrant layer, you ignite a sense of wonder, and the added crunch of rainbow sprinkles brings an extra dimension of fun. This cake stands out not only for its flavor but for the smiles it inevitably brings.
Preparation Phase & Tools to Use
Embarking on this culinary adventure requires just a few essential tools to ensure your cake turns out fabulously.
- Baking Pan: A 9×13-inch pan works best for even baking and easy slicing.
- Mixing Bowls: Use sturdy bowls to combine your cake mix and whipped cream.
- Fork or Toothpick: For poking holes into the cake, enabling it to absorb all the delightful sweetened condensed milk.
- Spatula: Perfect for spreading the whipped cream layers smoothly across the cake.
- Food Coloring: Get creative! Multiple shades bring your unicorn dreams to life.
When it comes to preparation, keep everything organized. Gather all your ingredients, preheat the oven before starting, and don’t rush the cooling process—let that cake cool down properly to avoid a soupy mess when adding the condensed milk.
Ingredients for Unicorn Poke Cake
- 1 box of yellow cake mix: This forms the soft and sturdy foundation of your cake. If you want a healthier twist, consider using a gluten-free cake mix.
- 3 large eggs: These add richness and stability to the cake.
- 1 cup of water: Essential for blending and baking the cake mix.
- 1/3 cup of vegetable oil: Provides moisture and a tender texture.
- 3 cups of whipped cream or Cool Whip: The fluffy clouds that create layers of sweetness. Feel free to use homemade whipped cream for an extra special touch.
- 1 cup of sweetened condensed milk: This golden elixir seeps into the cake to keep it dreamy and moist.
- Food coloring (multiple colors): Choose your favorite shades to create a rainbow effect that will dazzle your guests.
- Rainbow sprinkles: A sprinkle of magic to finish it off!
- Frosting (optional): If you desire an extra level of sweetness and a finishing touch.
How to Make Unicorn Poke Cake
- Preheat the oven according to the cake mix instructions, setting the perfect stage for baking.
- Prepare the cake mix: In a mixing bowl, combine the cake mix, eggs, water, and vegetable oil. Mix until smooth, feeling the smoothness of the batter as it forms.
- Bake the cake: Pour the batter into your greased pan and bake according to the package instructions until golden and a toothpick inserted comes out clean. The scent of cake drifting through your home will make it hard to wait!
- Cool the cake: Once baked, allow the cake to cool completely in the pan—resist the urge to rush this step!
- Poke holes: Use a fork to poke holes all over the cake, creating inviting pockets for that sweetened condensed milk. Get creative with spacing!
- Drizzle the milk: Pour the sweetened condensed milk all over the cake, ensuring it seeps into the holes, whispering promises of sweetness within.
- Color the whipped cream: In separate bowls, tint the whipped cream with food coloring to create bright, cheerful shades that mirror a rainbow.
- Layer the whipped cream: Starting with one color, spread it over the cake. Continue layering with different colors to achieve that magical rainbow effect—the more colorful, the better!
- Top with sprinkles: Adorn the whipped cream with a generous handful of rainbow sprinkles to make the cake sparkle.
- Chill before serving: Allow the cake to chill in the refrigerator for at least an hour. This helps the flavors meld and the textures set beautifully.
Chef’s Notes & Helpful Tips
- Make-ahead tips: You can prepare the cake and poke holes a day in advance, refrigerating it overnight to allow the condensed milk to work its magic.
- Cooking alternatives: If you’re short on oven space, consider using an air fryer for a smaller cake. Just adjust the time according to your air fryer’s instructions.
- Customization ideas: Want a flavor twist? Substitute the yellow cake with chocolate cake mix for a fun take on this classic recipe. You can also infuse flavors into the whipped cream, like vanilla bean or almond extract.
Common Mistakes to Avoid
- Skipping the cooling process: Rushing this step can lead to a soggy cake. Allow it to cool completely to ensure the sweetened condensed milk soaks in properly without turning into a mess.
- Not using enough whipped cream: Underestimating the amount can leave your cake feeling bare and lacking in flavor. Go big on the layers!
- Ignoring the poking: Failing to poke enough holes will prevent the cake from soaking up the milk, leading to a dry cake.
What to Serve With Unicorn Poke Cake
Pair your Unicorn Poke Cake with delightful accompaniments that enhance its magic:
- Vanilla Ice Cream: The cold creaminess pairs perfectly with the fluffy cake.
- Fresh Berries: Strawberries, blueberries, or raspberries add a refreshing burst of flavor.
- Whipped Cream: A dollop on top elevates the creamy texture.
- Fruit Salad: A vibrant, juicy medley complements the sweetness of the cake.
- Chocolate Drizzle: A rich, indulgent pour brings another layer of flavor.
- Lemonade: This refreshing drink balances the cake’s sweetness with a zesty kick.
- Coffee or Tea: These warm beverages provide a comforting contrast to the cake’s textures.
Storage & Reheating Instructions
Store any leftover cake in the refrigerator, covered with plastic wrap or in an airtight container. This keeps it fresh and moist. You can freeze the cake as well—just ensure it’s wrapped properly to prevent freezer burn. When ready to enjoy, thaw it in the refrigerator overnight, and feel free to add extra whipped cream upon serving for a fresh touch.
Estimated Nutrition Information
Approximate nutrition per slice (based on 12 slices): Calories: 290, Total Fat: 14g, Saturated Fat: 8g, Cholesterol: 60mg, Sodium: 200mg, Total Carbohydrates: 40g, Dietary Fiber: 1g, Sugars: 25g, Protein: 3g. Disclaimer: Values may vary based on specific ingredients used.
FAQs
What’s the difference between Cool Whip and homemade whipped cream?
Homemade whipped cream offers a fresher taste and can be sweetened to your liking with sugar or vanilla extract. Cool Whip is convenient for quicker recipes, but it has a much longer shelf life and can be stored when opened.
Can I make this cake gluten-free?
Absolutely! Substitute the yellow cake mix with a gluten-free version available at most grocery stores. Just ensure all ingredients are certified gluten-free.
How far ahead can I make this cake?
You can prepare the cake and poke holes up to 24 hours in advance. Just remember to keep it wrapped in the refrigerator to maintain its moisture.
What’s a good alternative to sweetened condensed milk?
You can substitute sweetened condensed milk with a homemade version by simmering regular milk with sugar or use a ready-made evaporated milk mixed with confectioner’s sugar for a similar but lighter effect.
How do I prevent my whipped cream from deflating?
Using heavy whipping cream and chilling your mixing bowl and whisk ensure that your whipped cream retains its structure. Also, don’t overmix; stop as soon as you see soft peaks.
Conclusion
As you embark on the delightful journey of making your very own Unicorn Poke Cake, feel the excitement fill your kitchen. Every step, from mixing to layering, carries a sprinkle of magic that culminates in a sweet treat capable of bringing joy to any occasion. Your friends and family will bask in the whimsical beauty and delicious flavor of this cake, making it a cherished dessert for gathering and celebrating. Let the flavors transport you to a land of sweetness, and don’t hesitate—dive into this unforgettable culinary adventure!
Print
Unicorn Poke Cake
- Prep Time: 20 minutes
- Cook Time: 30 minutes
- Total Time: 50 minutes
- Yield: 12 servings 1x
- Category: Dessert
- Method: Baking
- Cuisine: American
- Diet: Vegetarian
Description
A whimsical cake that combines a moist yellow cake with layers of colorful whipped cream and sweetened condensed milk, perfect for celebrations.
Ingredients
- 1 box of yellow cake mix
- 3 large eggs
- 1 cup of water
- 1/3 cup of vegetable oil
- 3 cups of whipped cream or Cool Whip
- 1 cup of sweetened condensed milk
- Food coloring (multiple colors)
- Rainbow sprinkles
- Frosting (optional)
Instructions
- Preheat the oven according to the cake mix instructions.
- Prepare the cake mix by combining the cake mix, eggs, water, and vegetable oil in a mixing bowl and mixing until smooth.
- Pour the batter into a greased 9×13 inch pan and bake according to the package instructions.
- Cool the cake completely in the pan.
- Poke holes all over the cake using a fork.
- Drizzle the sweetened condensed milk over the cake, ensuring it seeps into the holes.
- Color the whipped cream with food coloring.
- Layer the whipped cream on top of the cake in different colors.
- Top with a generous handful of rainbow sprinkles.
- Chill in the refrigerator for at least an hour before serving.
Notes
You can prepare the cake a day in advance and refrigerate it overnight. For a chocolate version, substitute yellow cake with chocolate cake mix.
Nutrition
- Serving Size: 1 slice
- Calories: 290
- Sugar: 25g
- Sodium: 200mg
- Fat: 14g
- Saturated Fat: 8g
- Unsaturated Fat: 4g
- Trans Fat: 0g
- Carbohydrates: 40g
- Fiber: 1g
- Protein: 3g
- Cholesterol: 60mg


")